Using an old MAC Pro as a NAS and I need HELP!

SORRY!! DSD (Dope Slap Deficiency). Those lines were from trying to get ANYTHING to work the way it did before I started this journey. Maybe too many iterations and flailing.

I think the //192.168.40… stuff DID work for many months. Now, not so much.

Would you recommend wiping out the whole FSTAB file and starting over?

I’d suggest clearing out the junk so it’s less confusing, I think you are trying to mount the Max as NFS so clear out all the CIFS stuff.

Do you just have one network folder to mount or are you mounting a selection of things?

1 Like

Clearing out the whole server and client things until I get just one to work.

Thanks for all the replies!

1 Like

After removing contents of commands in exports on NAS and fstab on osmc:

Sharing:~ nas$ sudo nano /etc/exports:

/Volumes/4TBshare1/Movies -network 192.168.40.0 -mask 255.255.255.0

osmc@osmc:~$ sudo nano /etc/fstab:

/Volumes/4TBshare1/Movies -network 192.168.40.0 -mask 255.255.255.0

osmc@osmc:~$ showmount -e 192.168.40.164

Export list for 192.168.40.164:
/Volumes/4TBshare1/Movies 192.168.40.0

MNT is still empty on Vero4K

Hi,

That entry should only be used in the exports on the Mac, the fstab entry should look like this:

Regards Tom.

/Volumes/4TBshare1/Movies -network 192.168.40.0 -mask 255.255.255.0
is in the MAC exports and using either 192.168.40.0 or 192.168.40.164 (rebooting NAS and vero after each change) is still coming up empty on the vero

The fstab now looks like this:
192.168.40.164:/nfs/4TBshare1/Movies /mnt/Server_Movies nfs noauto,x-systemd.automount 0 0

It’s in Files/Mnt/ on the vero, but empty, hangs when I try to add the files and times out to nothing

osmc@osmc.$ showmount -e 192.168.40.164
Export list for 192.168.40.164:
/Volumes/4TBshare1/Movies 192.168.40.164
osmc@osmc$ cd /mnt
osmc@osmc:/mnt$ ls
Server_Movies
cd: /mnt/Server_Movies: No such device

Hi,

What’s the output of:

sudo mount -v /mnt/Server_Movies

Thanks Tom.

Sharing:~ nas$ sudo nano /etc/exports =
/Volumes/4TBshare1/Movies -network 192.168.40.164 -mask 255.255.255.0

Vero FSTAB = /Volumes/4TBshare1/Movies -network 192.168.40.164 -mask 255.255.255.0

osmc@osmc:~$ sudo mount -v /mnt/Server_Movies
mount: /etc/fstab: parse error at line 8 – ignored
mount: /mnt/Server_Movies: can’t find in /etc/fstab.

Could this be a RIGHTS issue? I add new files daily while logged in to the NAS server as user “NAS”, the OWNER of the entire hard drive, ownership pushed down to all files and subfolders.

Trying again with 192.168.40.0

Same results with both

In one post you say one thing and in the next post you say something else, stop changing things constantly and just do as you are told.

Show the exports on the Mac, what does it look like now.

Show the fstab on the vero, what does that look like now

Do a ls -al on /mnt and show us what that looks like

Give us the info we want and then don’t touch anything till you get a reply

I think exports should looks like this:

/Volumes/4TBshare1/Movies -network 192.168.40.0 -mask 255.255.255.0

I think fstab should look like this:

192.168.40.164:/Volumes/4TBshare1/Movies /mnt/Server_Movies nfs noauto,x-systemd.automount 0 0

1 Like

On a fresh instance of vero 4K reimaged from osmc downloads and the Exports file on the NAS server and the fstab exactly as you requested on your above post

osmc@osmc:/$ cd /mnt
osmc@osmc:/mnt$ ls
Server_Movies
osmc@osmc:/mnt$ ls -al
total 8
drwxr-xr-x 3 root root 4096 Nov 22 17:29 .
drwxr-xr-x 20 root root 4096 Nov 22 16:50
drwxr-xr-x 2 root root 0 Nov 22 17:29 Server_Movies
osmc@osmc:/mnt$

I’m sitting on my hands until I hear back from you.

I presume ls -al of Server_Movies is still showing nothing.

Does sudo mount -a -v change anything?

Show the output of the mount command

1 Like

We also probably also want a

showmount -e 192.168.40.164

From the Vero to check that the NAS is correctly exporting things

I’m using a Mac Studio for my NAS. I gave up on NFS (I was stumped) but I have it working with SMB and configured fstab.

If it would help I can provide my config on the Veros and mac.

osmc@osmc:~$ mount -a -v

/mnt/Server_Movies : ignored

osmc@osmc:~$ showmount -e 192.168.40.164

Export list for 192.168.40.164:

osmc@osmc:~$

Gwarph,

Does your SMB fstab look like this?

//192.168.87.164/4TBshare1/Movies /mnt/Server_Movies cifs x-systemd.automount,noauto,rw,iocharset=utf8,credentials=/home/osmc/.credentials,uid=osmc,gid=osmc,file_mode=0770$,dir_mod$

You can DM me at Gonster.Macher @gmail.com

If the showmount isn’t coming back with anything then you need to revisit your settings on the Mac first, you need not try anything on the Vero till showmount shows you the file system being exported.

I think the mistake is partly mine, I think the line I gave you should have a / in front of it.

You had this working earlier.

Here is my fstab:

osmc@KodiKave:~$ cat /etc/fstab
# rootfs is not mounted in fstab as we do it via initramfs. Uncomment for remount (slower boot)
#/dev/vero-nand/root  /    ext4      defaults,noatime    0   0
//10.7.10.29/Movies /storage/ServerMovies cifs x-systemd.automount,noauto,rw,iocharset=utf8,username=kodi,credentials=/home/osmc/.credentials,uid=osmc,gid=osmc,file_mode=0770,dir_mode=0770,vers=3.0 0 0
//10.7.10.29/Concerts /storage/ServerConcerts cifs x-systemd.automount,noauto,rw,iocharset=utf8,credentials=/home/osmc/.credentials,uid=osmc,gid=osmc,file_mode=0770,dir_mode=0770,vers=3.0 0 0
//10.7.10.29/Music /storage/ServerMusic cifs x-systemd.automount,noauto,rw,iocharset=utf8,credentials=/home/osmc/.credentials,uid=osmc,gid=osmc,file_mode=0770,dir_mode=0770,vers=3.0 0 0
//10.7.10.29/TVShows /storage/ServerTVShows cifs x-systemd.automount,noauto,rw,iocharset=utf8,credentials=/home/osmc/.credentials,uid=osmc,gid=osmc,file_mode=0770,dir_mode=0770,vers=3.0 0 0
osmc@KodiKave:~$

I use a credential file that has the username and password of a macOS user.

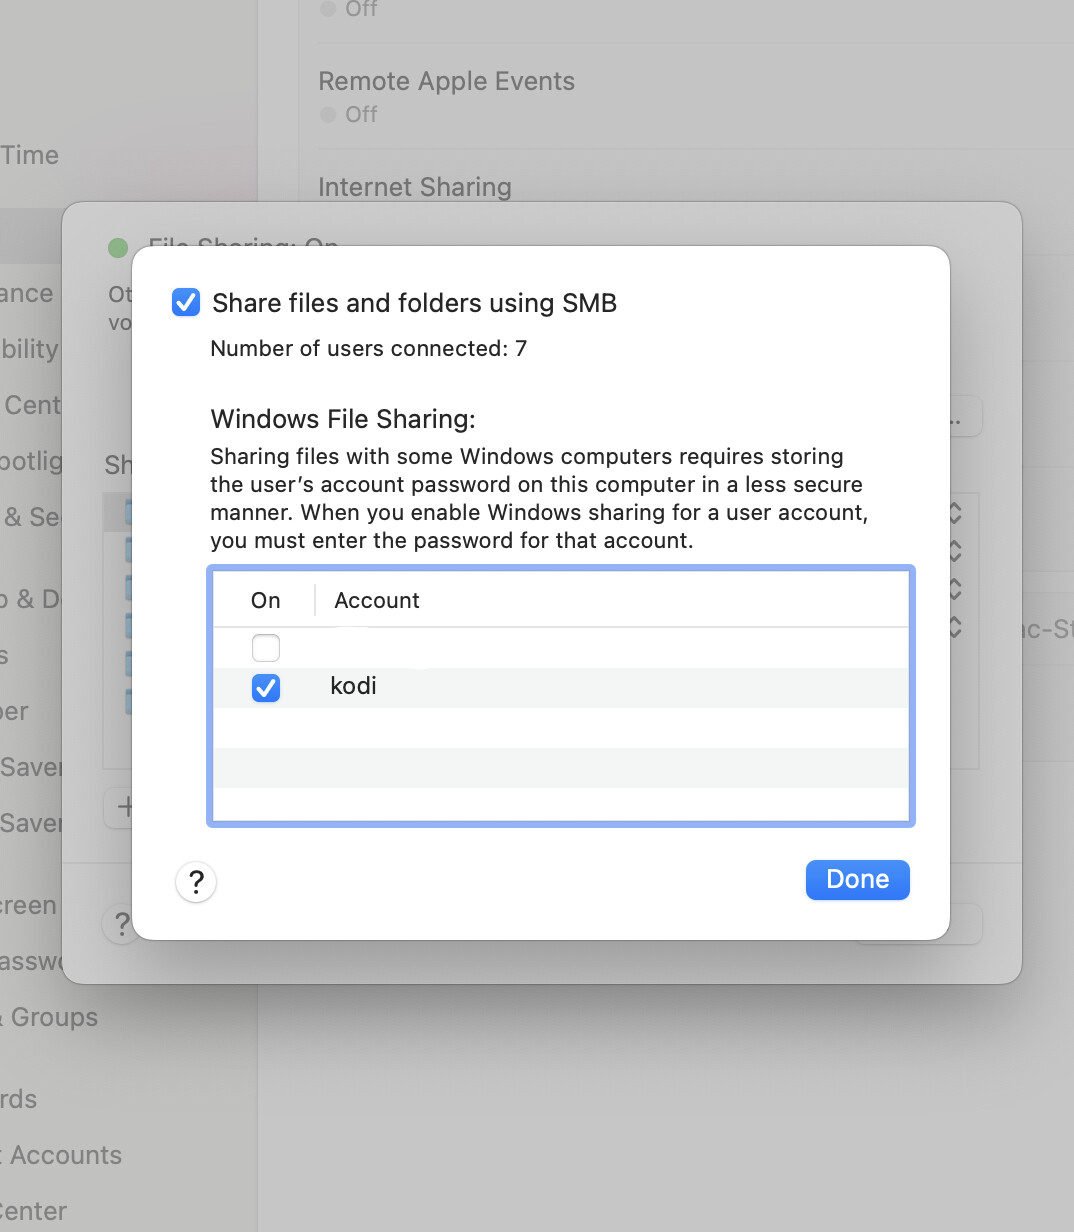
On the Mac, I created a user (Kodi). I then enabled ‘Sharing’ (System Settings, General, File Sharing) and gave user Kodi access to the shared volumes. The final piece of the puzzle was clicking on ‘Options’ and adding the user Kodi: