Airsonic/libresonic/subsonic allow you to stream music/video over the internet, so you can listen your petabyte music collection in your phone
This is a noob aimed tutorial so everyone should be able to do it
What I used
- windows computer with 7zip/winrar/etc
- raspberry pi 3 with OSMC 17.3 installed
- putty ssh client
- samba share to copy some files over (probably not needed but that’s how I managed)
- lot’s and lot’s of google
1 .Samba (access OSMC folders with Windows explorer)
So first you’re going to MyOsmc>Appstore>Samba>Install
Install putty make sure you can connect to your raspi3
type the raspi local ip (you can check/set this in MyOsmc>Network) and click Open
A console should appear with “login as:” type osmc and password also type osmc (you can’t see your password being typed, but it’s there don’t worry)
2 .Setting up the files
I tried installing java the regular way, but I failed over and over
Go to oracle website and download the latest Linux ARM 32 Hard Float ABI build (download current one)
Extract the .gz file you just downloaded; run 7zip as admin otherwise it will probably fail the unpack. You should have .tar file now extract that aswell and you should now have a folder called jdk1.8.0_144 or jdkversionnumber
Now open the folder jdk1.8.0_144 and copy the jre folder to your Osmc
Filexplorer Network>osmc>osmc or type \osmc\osmc in the addressbar
it should look like this
3 .Time to install Java
( I followed this guide and adapted)
Install putty and make sure you can connect to your raspi3 via ssh
type the raspi local ip (you can check/set this in MyOsmc>Network) and click Open
A console should appear with “login as:” type osmc and password also type osmc (you can’t see your password being typed, but it’s there don’t worry)
Now type the following commands
mv /home/osmc/jre /opt
sudo update-alternatives --install /usr/bin/java java /opt/jre/bin/java 100
Now let’s check if it installed
java -version
Should output something like: Java™ SE Runtime Environment (build 1.8.0_-) Java HotSpot™ Client VM (build 25.131-b11, mixed mode)
4 .Installing Airsonic (Stand-alone WAR installation)
sudo mkdir /var/airsonic
chown osmc /var/airsonic
wget https://github.com/airsonic/airsonic/releases/download/v10.0.1/airsonic.war --output-document=/var/airsonic/airsonic.war
java -jar airsonic.war
This last command takes time, at the end it should fail saying it can’t use the port 8080, this makes sense since this port is used by osmc already
so try running
java -Dairsonic.home=/var/airsonic -Dserver.port=8081 -jar airsonic.war
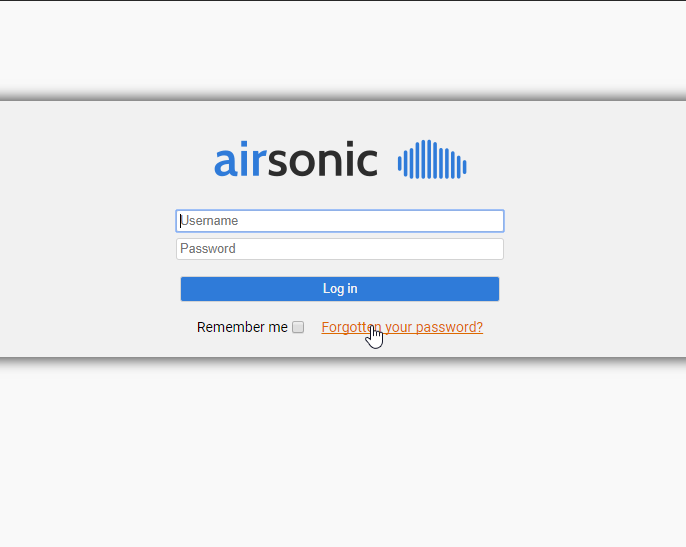
You should be able to go to htttp://your.local.ip:8081/airsonic and see this
Just one problem now, if your raspi reboots, you have to run this command every time to start airsonic, and that’s a pain
So let’s set it up as a systemd service:
wget https://raw.githubusercontent.com/airsonic/airsonic/master/contrib/airsonic.service -O /etc/systemd/system/airsonic.service
sudo mkdir /etc/sysconfig/
wget https://raw.githubusercontent.com/airsonic/airsonic/master/contrib/airsonic-systemd-env -O /etc/sysconfig/airsonic
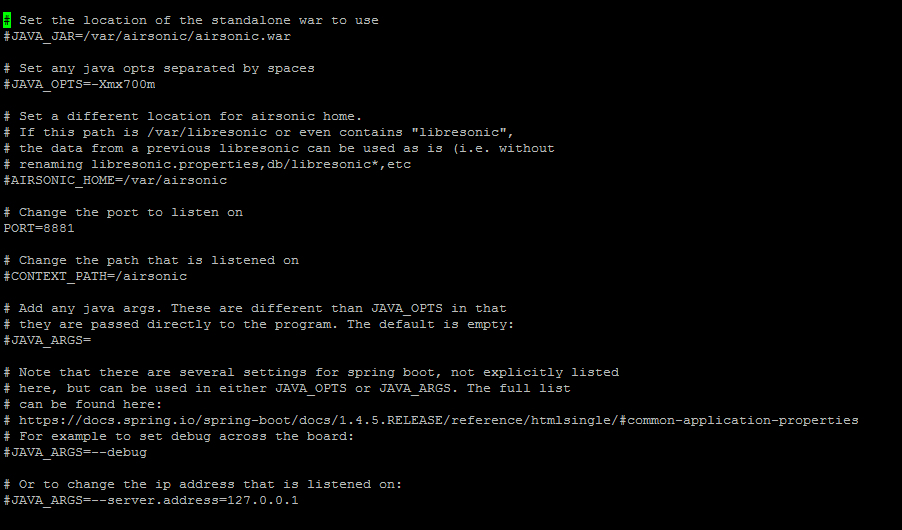
Now let’s permantly edit that port
sudo nano /etc/sysconfig/airsonic
Remove the # in that line and choose the port to your liking
Eg:
5 .Final commands
systemctl daemon-reload
systemctl start airsonic.service
systemctl enable airsonic.service
In osmc go to Power>Reboot
And there it should be working, you’ll have access htttp://your.local.ip:8081/airsonic
username: admin
password: admin
6 .Final thoughts
(too tired will edit)
tl;dr version soon, can’t post this in the HowTo category