This How To guide is obsolete and replaced by the new thread TVHeadend 4.2 Setup with the Sat>IP Server AVM FRITZ!WLAN Repeater DVB-C on OSMC
Introduction
This article describes a setup of TVheadend with the OSMC platform and the German AVM FRITZ!WLAN Repeater DVB-C which lets you watch live TV and handle private video recordings. Tested with
HW: Vero + Raspberry Pi 2 B
OS: OSMC 2015.08-1 ... 2016.04-1
SW: TVheadend Server 4.0.5 (OSMC preinstalled), TVheadend HTSP CLient 2.1.16 ... 2.2.14 (OSMC preinstalled)
IPTV tuner: AVM FRITZ!WLAN Repeater DVB-C, FritzOS 06.30 ... 06.32
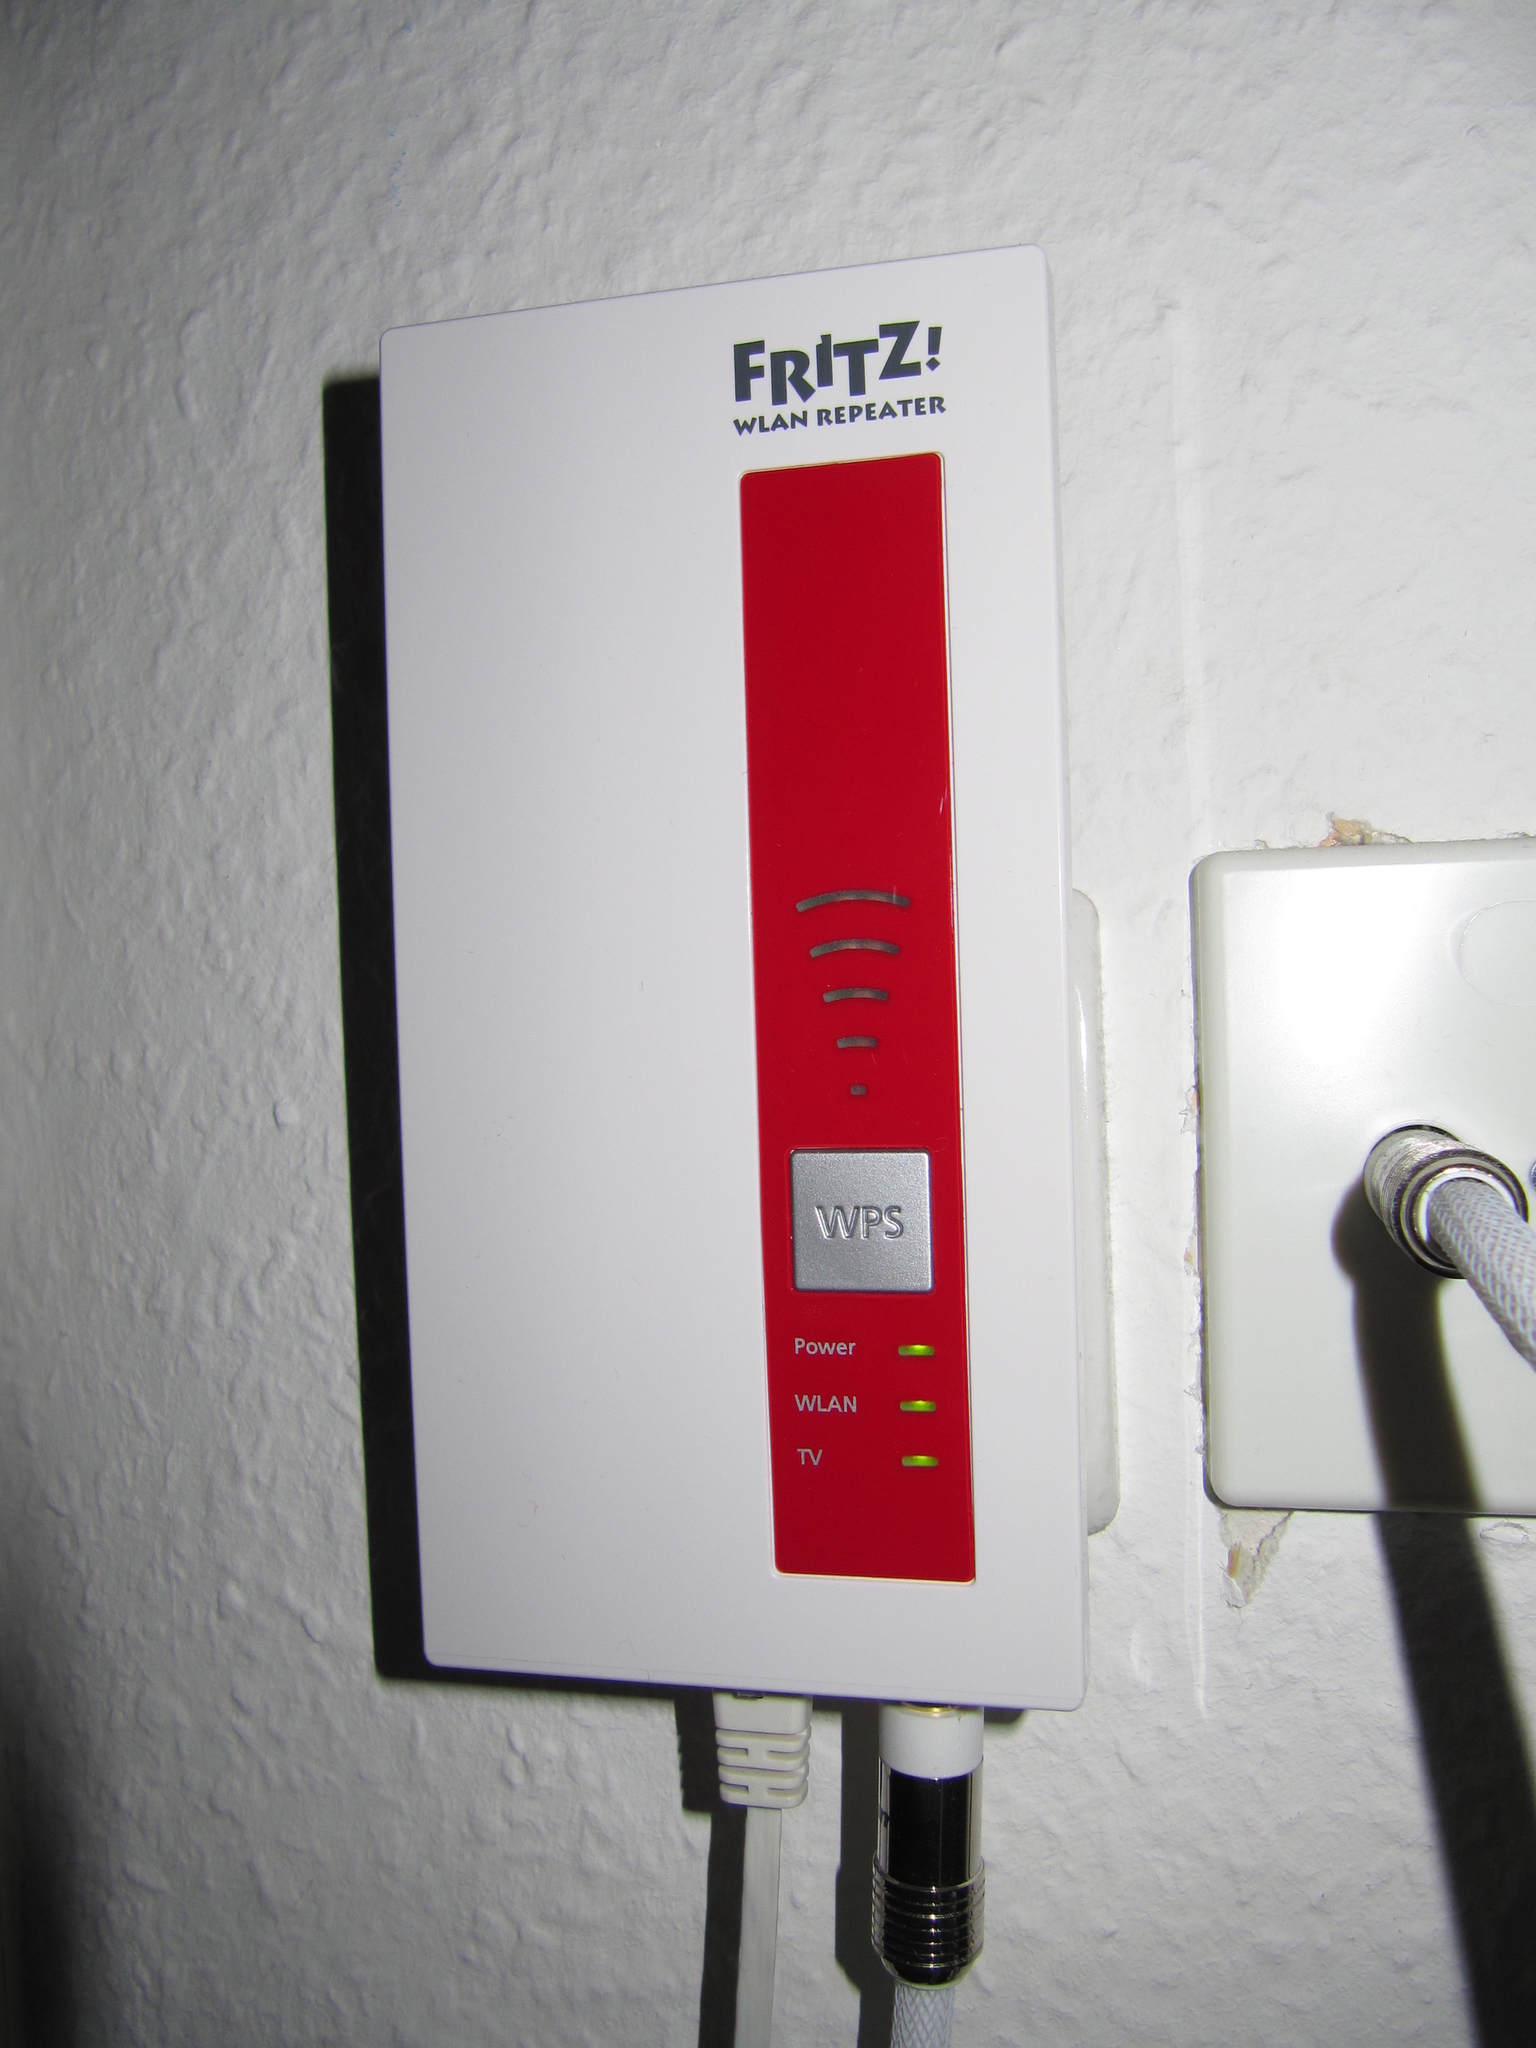
The AVM FRITZ!WLAN Repeater DVB-C is a popular 2.4 and 5 GHz WLAN repeater in Germany with a Gigabit LAN connector and a dual DVB-C tuner. It can operate in WLAN repeater mode as well as access point and provides IP TV via rtsp (real time streaming protocol).
Get the rtsp information from the DVB-C device
The AVM DVB-C device provides the rtsp IP TV stream information as mu3 files, only. Unfortunately TVheadend is currently not able to process m3u directly. So you need to download the data manually and create the muxes (a mux is to be seen as a carrier signal on which channels are multiplexed) and channels by hand in a web-based graphical user interface.
In the web GUI of the DVB-C device go to DVB-C->Senderliste and create the m3us for HDTV and SDTV on your local PC by using the link “Senderlisten erzeugen” (English: Create sender lists) at the bottom of the web page.

Install, activate and configure TVheadend in OSMC
Tvheadend consists of two parts since it is a client-server model. The server is responsible to transform the source stream (here with the AVM repeater based on RTSP, Real Time Streaming Protocol) to another namely HTSP (Home Tv Streaming Protocol).
The client always understands HTSP and transforms the HTSP data stream for the target device/puropose and implement functions like pvr, network, mux and channel coordination and maintenance.
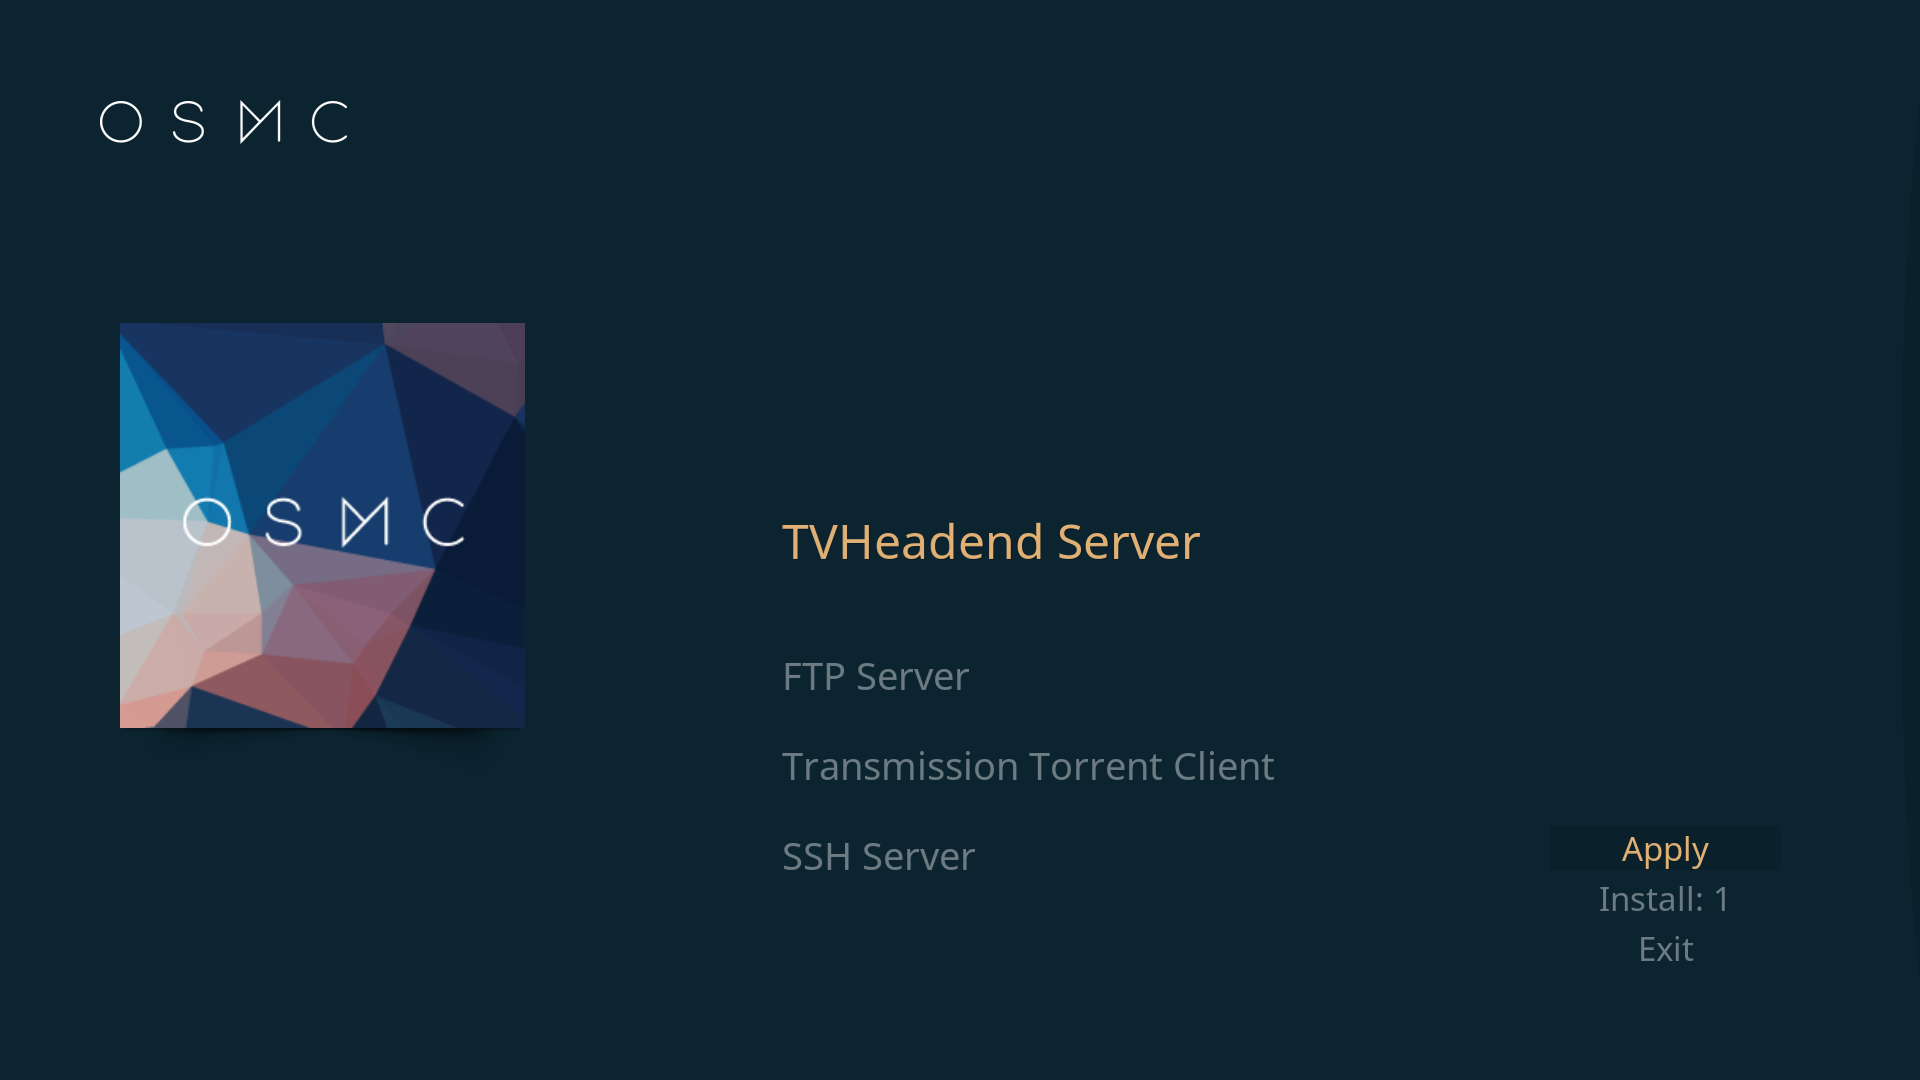
Install TVheadend server first
In the OSMC desktop GUI goto My OSMC → App Store and install Tvheadend
Configure and activate the preinstalled TVheadend HTSP Client
In the OSMC GUI goto
Settings->Add-ons->My Add-ons->PVR Clients->TVheadend HTSP Client
and configure the Connection Settings by specifying username and password, i.e. osmc/osmc.
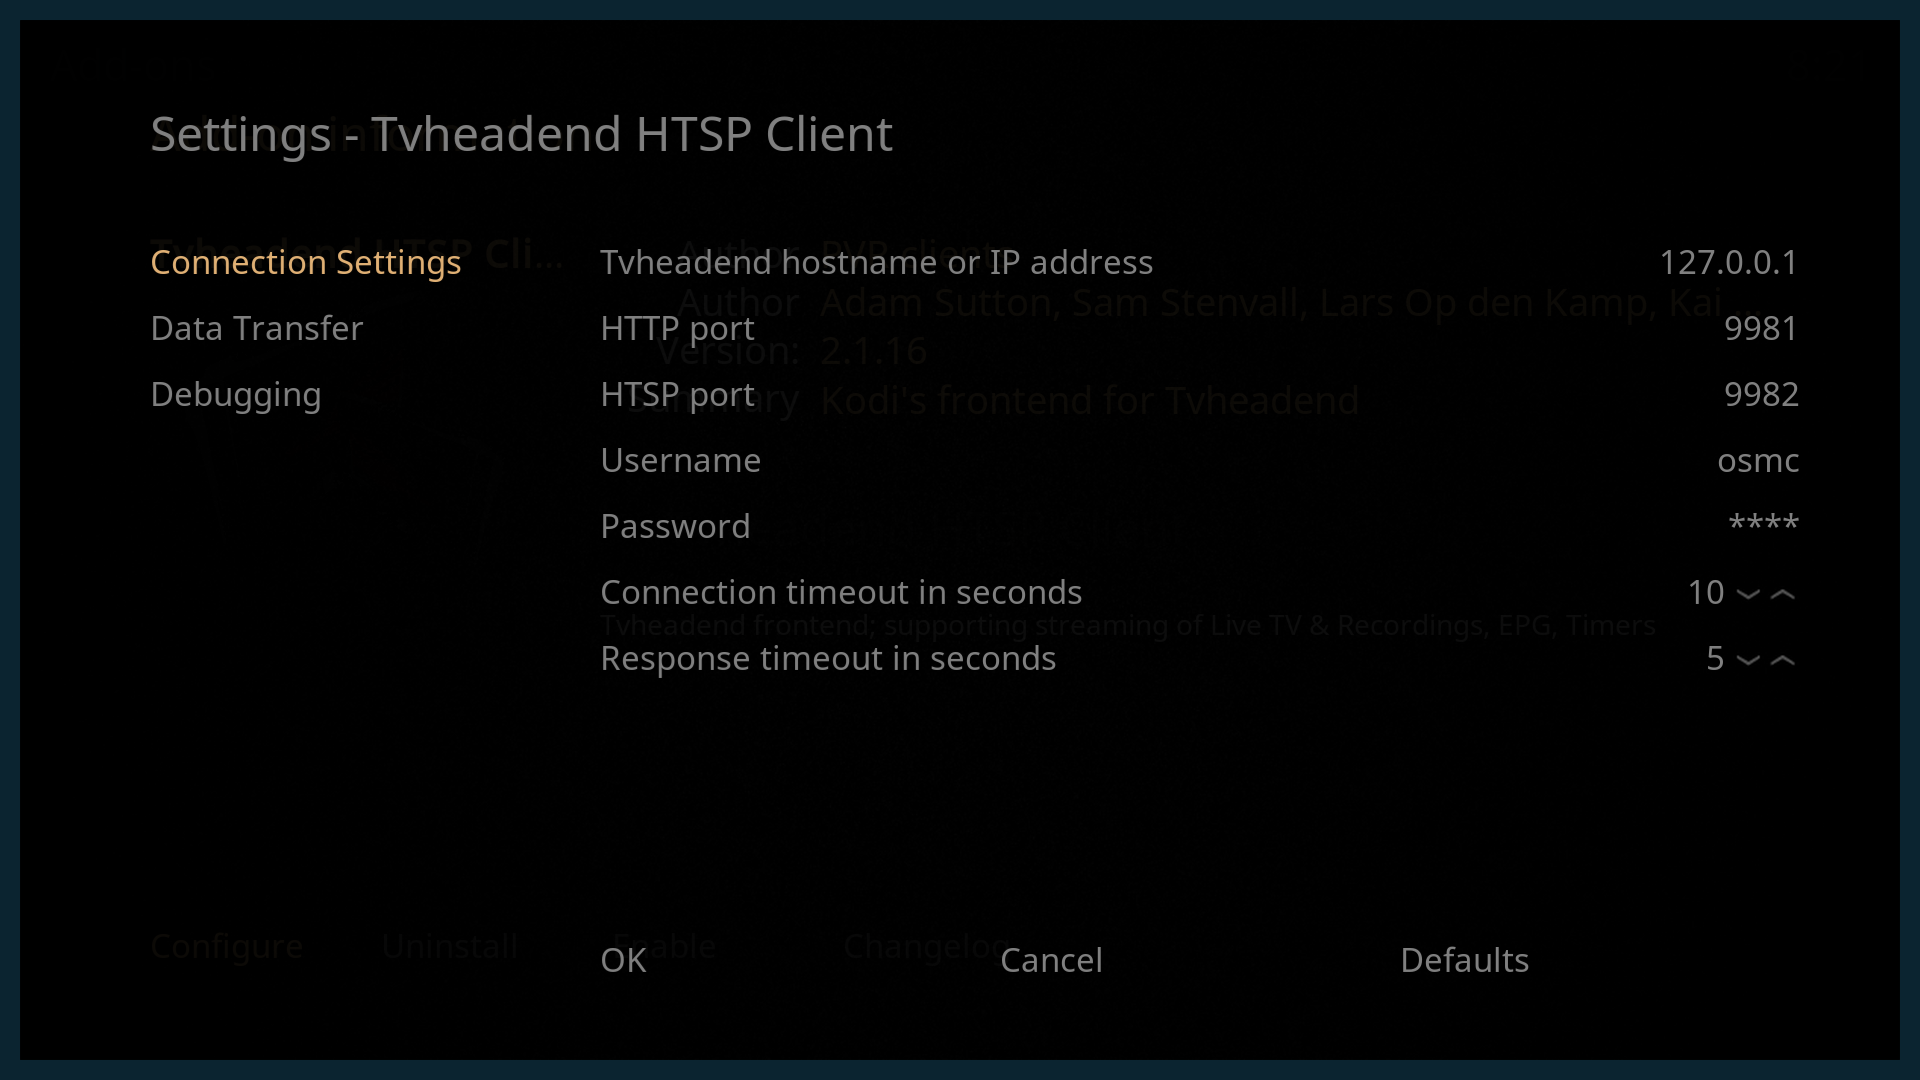
Finally Enable the software.
Configure Live TV in the OSMC GUI
Goto Settings-> TV
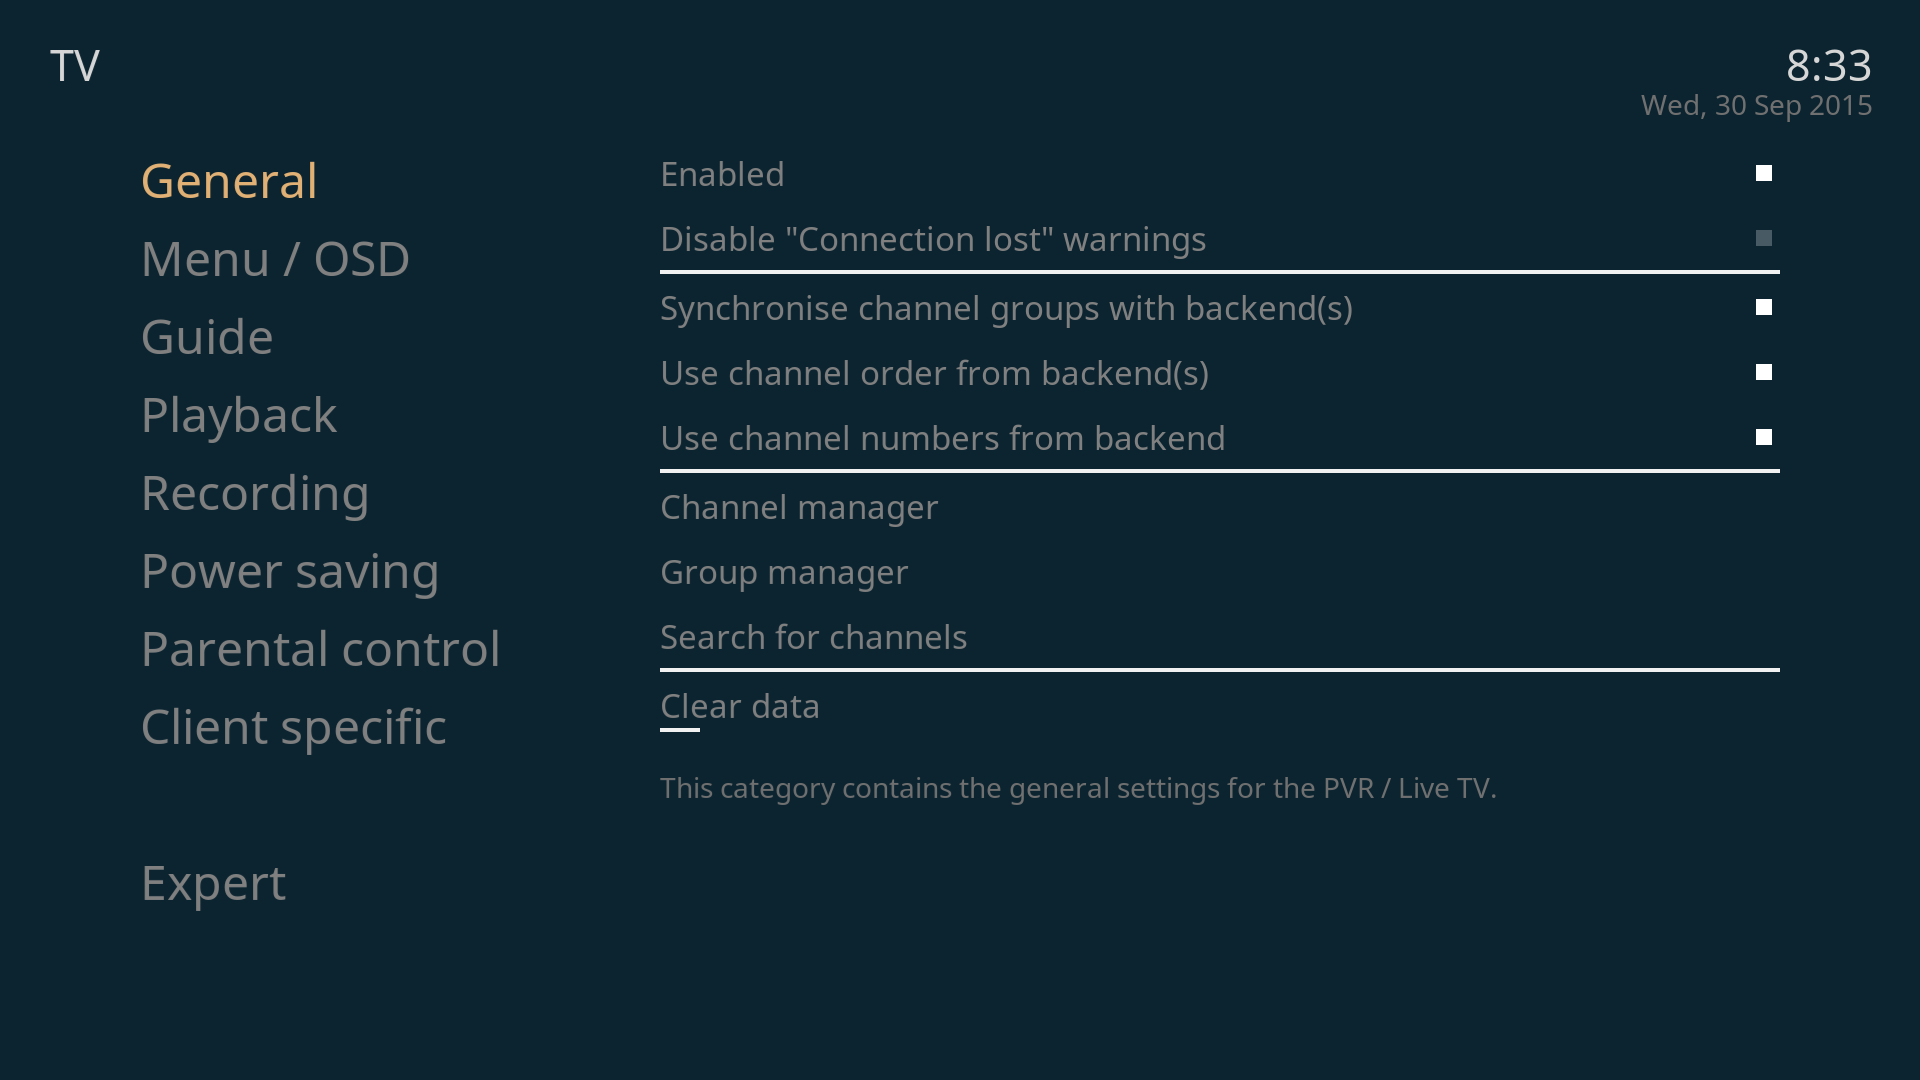
Activate
- General->Enabled, (I also activated Use Channel numbers from backend)
- Guide->Prevent Updates during playback
- deactivate Playback->Start playback minimized
Configure the program channels using the TVheadend HTSP Client web interface
The most TVheadend configuration has to be done via the HTSP web interface, so start a browser to URL
http://<ip or DNS of the OSMC device>:9981
and log in using the credentials you have specified above and choose the Configuration tab.
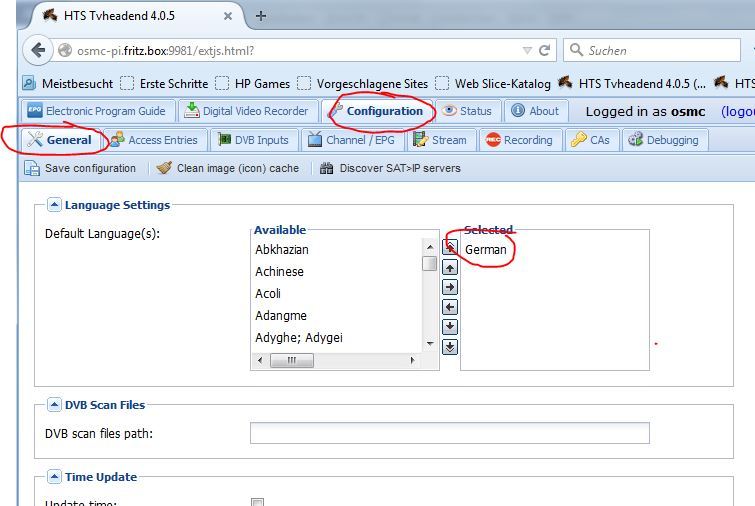
Choose Configuration->General->Language Settings: Specify your language (in this example it was German)
Choose Configuration->DVB Inputs->Networks and add a new IP TV entry with the settings shown below

The AVM DVB-C device has two tuners but can only provide one stream per device (identified by the IP). Limiting the number of input streams avoids conflicts with parallel playings/recordings, epg grabber and service mapper.
ATTENTION: Be sure to reduce the Max TimeOut value since it is essential to the runtime of the service mapping process, later. One second is a value which works perfect in a Giga-LAN switch network, on problems you can increase it to 2 or 3 but with the costs of doubling or even tripling the service mapping runtime, later. Once the initial service mapping process has finished, you can carefully increase this value in case of TV channel switching problems, default value is 15.
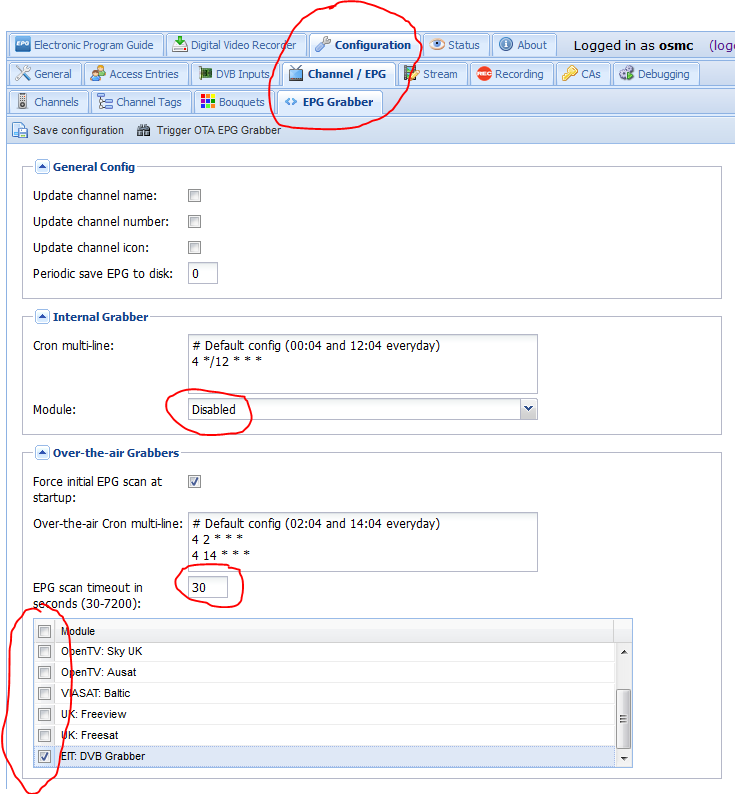
Before setting up the muxes and channels within TVheadend, first correct the configuration of the EPG grabber to prevent continuously running EPG collections.
Go to Configuration-> Channel/EPG-> EPG grabber menu, limit the value EPG scan timeout to 30 and deselect all OTA grabbers modules except the EIT EPG Grabber. Afterwards save the configuration.
Now it is time to create a single mux for each TV channel you want to have available within OSMC. If you look into the AVM DVB-C m3u files, you find that every TV channel has an entry like
#EXTINF:-1,BBC HD
#EXTVLCOPT:network-caching=1000
rtsp://192.168.178.27:554/?freq=794&bw=8&msys=dvbc&mtype=64qam&sr=6900&specinv=1&pids=0,16,17,18,20,261,553,554
where BBC HD is the name of the TV channel and rtsp://…,554 is the related URL of the stream the DVB-C device offers for this channel.
With that information go to Configuration-> DVB Inputs->Muxes and add a new mux for the first TV channel in your previously created network like shown below

Redo the previous step for every TV channel you want to be available for Live TV within OSMC. Every TV channel has afterwards a single mux entry. This step is somewhat painful but as long as TVheadend does not offer the import of m3u files, this cannot be shortened.
TVheadend has meanwhile found several services for each mux. Don’t worry you don’t have to manually find the single service of each mux which really provides the TV channel.
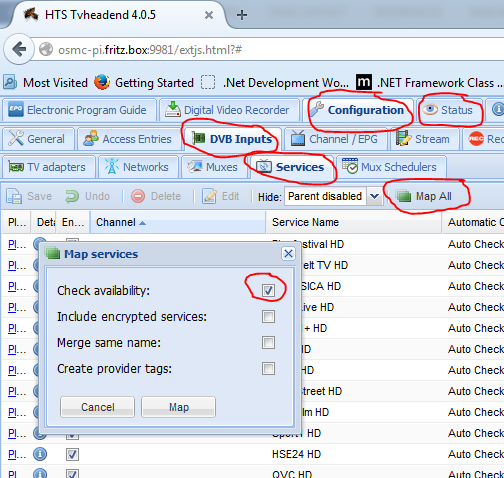
Go to Configuration → DVB Inputs → Services and click on Map All. In the Map Services popup select Check Availability. Now TVheadend tests each found service but only maps a channel to the working ones.
ATTENTION: If you have forgotten to reduce the Max. TimeOut value of the network entry, this could last many hours! You can check the activity of the service mapper also in the Status menu on top.
As last step verify in the menu Configuration->Channel/EPG->Channels that you see the same number of found channels like the number of muxes you created. Otherwise look for phantom channels where the service name and channel name are not the same and delete them. In case you have less channels than muxes go to Configuration->DVB Inputs->Services, sort the column Mux and look for a mux that has no channel assigned. Manually select all entries of this mux and choose Map Selected to repeat the service mapping for those entries.
You are done creating the TV channels within TVheadend. On the OSMC desktop interface you should now see a new entry named Live TV. The collection of the EPG information should have started.

Private Video Recording setup
For PVR you have to configure the location for the recordings and other values. In the TVheadend HTSP web GUI go to
Configuration->Recording->Video Recorder Profiles
and put in your values, here is just an example. Save your changes to make them active.
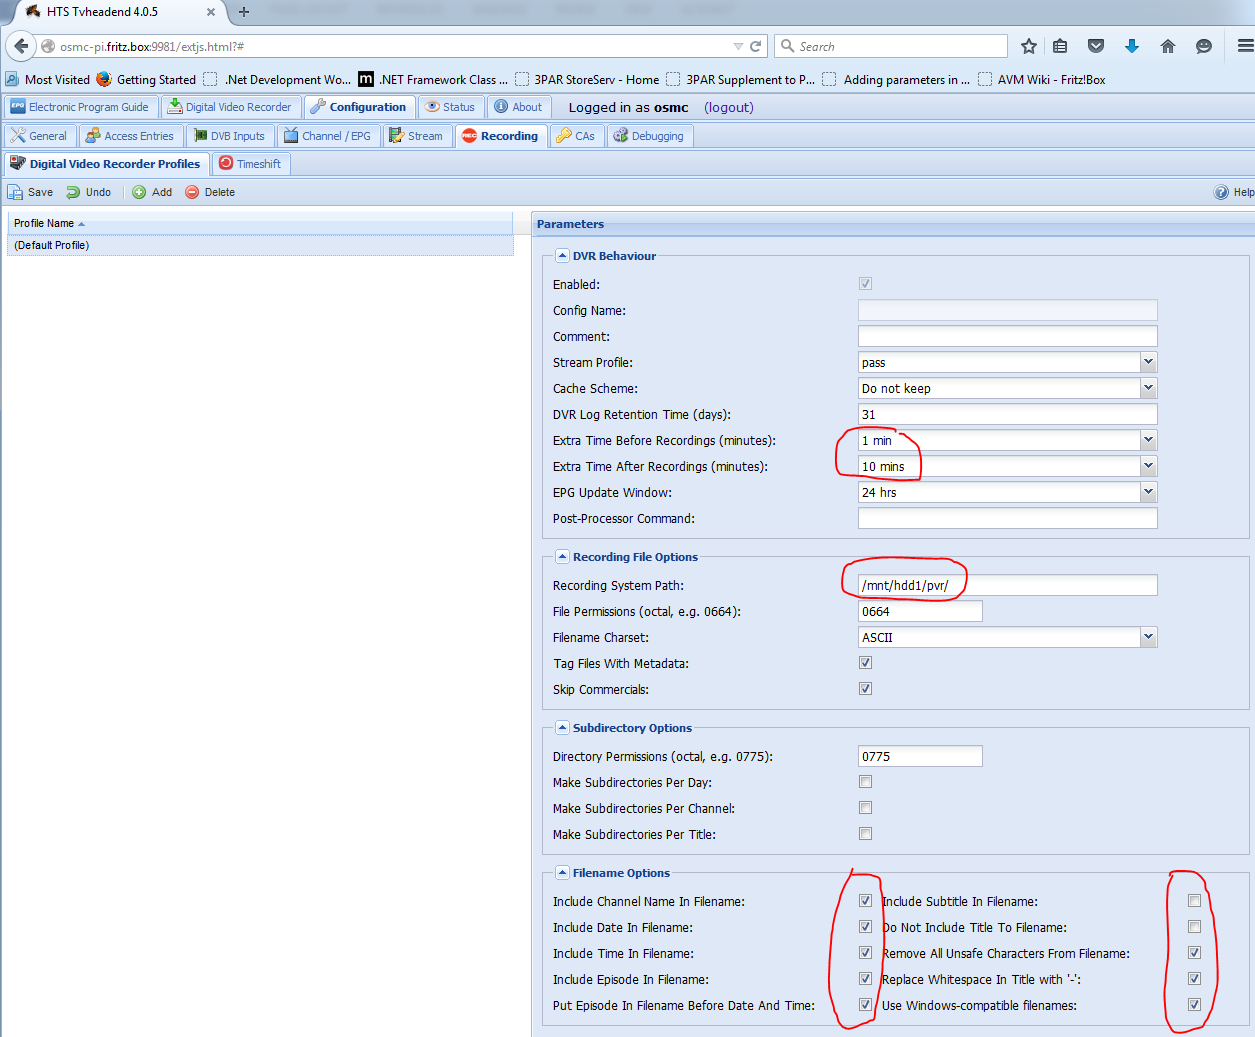
Here an external hard disk was mounted and TVheadend configured to use directory /mnt/hdd1/pvr/ as the location for recordings.
Tips, current issues, etc.
-
With OSMC 2015-08.1 the playback of recordings in the menu Live TV → Recordings was choppy and stuttering. This improved dramatically with OSM 2015-09.1 but still there micro judders can be seen on heavy movements in the video material. A perfect playback you get in the menu Video – Files of OSMC.
-
The rtsp stream from the AVM device is not always handled correctly by TVheadend when manually switching between the TV channels. TVheadend Bug 2943 describes some possible scenarios but also includes the solution which is expected to be seen in TVheadend 4.2 coming, soon.
-
The AVM FRITZ!WLAN Repeater DVB-C has two tuners and for sure you can use both at the same time for your Raspberry Pi but this requires a second IP (an IP alias) on the Pi to be configured, so the DVB-C repeater thinks to serve two different devices. This is just the idea but should followed up by someone else in another article.
-
The German forum http://ip-phone-forum.de is visited by a very active AVM product community and is an excellent source for questions and help regarding the AVM DVB-C.
-
Automatic deletion of old recordings
In the HTS TVheadend menuConfiguration->Recordingyou can set
DVR Log Retention Time (days)
but this only cleans the related EPG information after the configured amount of days instead of deleting the recorded TV film.
If you want to have the both (information and recording) automatically deleted after a specific time (in example 14 days, recording path is/mnt/nas1/tv_recordings/), you can implemented it in the HTS TVheadend menuConfiguration->Recordingthis way:
DVR Log Retention Time (days): 14
and
Post-Processor Command:
find /mnt/nas1/tv_recordings/ -mtime +15 -or -type d -and -empty -exec rm -r {} ;
which automatically cleans the EPG information of all recorded TV recordings older 14 days and purges any files with a modification date older than 15 days and all empty directories out of the recording path. This will be executed after every recording.


