He used mkfs.ext4 which indicates that he executed it manually (not with gparted)
I disconnected all my other USB HDDs from my Vero as a precautionary measure (can’t accidentally format the wrong drive if it’s not even hooked up).
I then used PowerShell from my Win10 machine to SSH commands to OSMC to format the drive.
If you need help doing the same thing, I can walk you through it but as fzinken pointed out, everything I did is layed out in my posts above, but I could condense it for you.
All that being said, I haven’t noticed any performance benefits on the ext4 8TB drive verses my NTFS 8TB drive.
Transferring files from my Win10 machine over gigabit LAN is indistinguishable.
If I plug the ext4 drive into my Win10 machine’s USB 3.0 port I get 135MB/s using Linux File Systems for Windows by Paragon Software where if I plug my NTFS drive in I get 170MB/s.
So about a 20% overhead loss by the Paragon software, which is to be expected.
So when it comes to transferring files to the Vero, I’m afraid there’s no benefit for a Windows user to use ext4.
The network speeds are the same (throttled by the USB 2.0 ports) and you lose 20% using middle man software for plugging directly into your WIndows machine.
I know everyone (including the main Vero people) are saying ext4 is best, exFat is okay, and NTFS is worse, but unless you are using your Vero to do tasks other than playing back files (running a torrent daemon, etc.) I can see no benefit for a Windows user to use ext4 when exFat and NTFS perform just fine and file transferring is way faster at best and equal at worse.
Real world results matter to me more than theoretical technical performances.
I have done the real world test.
I went and purchased another Seagate Backup Plus Hub 8TB (my CostCo has them for $120 right now) and copied my entire UHD Remux collection to the new ext4 formatted drive.
No benefits in file transfer or in playback.
Both the NTFS and the ext4 play the files just fine.
So what have we learned?
The USB 2.0 interface is a bottle neck before NTFS or it’s userland driver.
I’d be real curious to see the network transfer speed difference between an ext4 drive and an NTFS drive if the Vero 4K+ had USB 3.0.
Then we might see a difference.
Here’s to hoping the next Vero version has USB 3.0 (I’d re-buy the Vero if they did).
I run NTFS smb shares (located on a win10 pc) via kodi, which should be the slowest of them all.
It plays everything nice and smooth, but I do have a gigabit ethernet connection both on the vero and the pc. The wireless on the vero is not fast enough to do it, I would happily buy a new vero if it has a 2x2 or 3x3 Wifi 6 (AC) connection.
Both NTFS and ext4 are journaling filesystems, for maximum performance one could try to use ext2 which is not (but you probably want a journaling filesystem if you move drives around).
No you run smb shares. The underlying file system does not factor in when your hardware is fast enough that it is not a bottleneck to your network connection.
If you mounted those Samba shares via an OS mount, I’m confident the WiFi would be sufficient for you to play 4K UHD rips.
Sam
Not completely, although you don’t see a direct performance difference with a stopwatch, you need less other system ressources using ext4 especially CPU. Also curious to see the effect, I collected performance data via collectl and put it into a special visualizing tool. Test was to copy 8 GB data from a PC (Win10) to the Vero4k using CIFS/SMB and similiar HDDs, one with ext4 the other with NTFS formatted. Mediacenter, TVheadend, etc. were stopped while the tests:
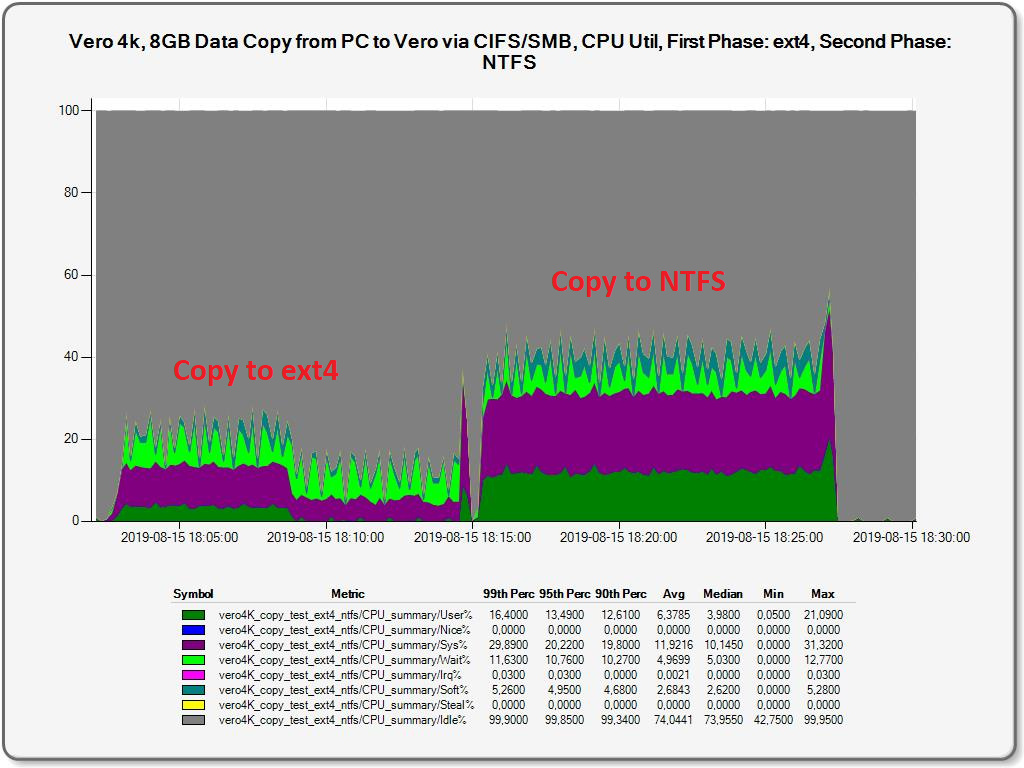
As you can see, on a Vero4k the total CPU utilization is twice the time for NTFS processing compared to ext4. I got full bandwidth while the uploads but the Vero 4k is limited to 100 Mbit/s without a Gigabit adapter.
In other words: On a Vero 4k this operation could be handled with ext4 by a single CPU core (one core is 25% in the diagram above) … but using NTFS you already need two CPU cores for the same work. As long as there is enough CPU power, you’re fine but if you plan to use CPU intensive addons or skins … this could lead to problem situations.
3 Likes
Thanks for your input!
That’s an awesome visualization.
Never the less, in the real world there’s no difference to the user.
If I have a quad core and one way uses 25% of a single core and the other uses 25% of two cores, yes the one way is more efficient, but when I have four cores and the load is only 25% on one or two fo them, I don’t see anything as a user.
I mean , isn’t that the whole reason we have these processors… so they can do things fast that are not even optimized.
I remember back in the day we were so excited when AMD launched the first 1GHz CPU and it was faster than the current Pentium 3 733MHz processors, but people would say things along the lines of how the intructions were more optimized for Pentiums on certain tasks, yet the AMD would still outperform it because of it’s sheer raw power.
Now, I’m all about efficeincy, and that should always be a goal, but when I’m sitting on multiple cores and 2GHz+ of processing power, I’m not concerned about 24% vs 40%.
There is no doubt in my mind that the ext4 will win every benchmark over NTFS on a Vero, but we’ll exhaust the throughout of USB 2.0 everytime before we see any issues visible to the end user.
Get me a benchmark showing the difference in MB/s transferring that 8GB file from the Vero’s internal memory to the ext4 USB HDD and the NTFS USB HDD and back.
I’d bet good money they are nearly identical (because both are faster than USB 2.0).
Also worth noting, USB 3.0 is less CPU intensive than USB 2.0 because USB 2.0 uses polling.
I had an Athlon 1GHZ.
Sorely disappointed when Far Cry came out and I thought I’d be able to play it based on their minimum spec listing…
USB2 isn’t the bottleneck here. The filesystem is.
Depends on PHY implementation. For DWC, I’d say no.
If you could condense it down I would appreciate that and have another go at it over the weekend
Many thanks
Since you are more comfortable with Windows I would just try the gparted route. Just go here and download tuxboot and make a bootable USB stick. I would probably try doing it on your Win7 laptop as getting that stick to boot from the BIOS is probably easier than dealing with your Win8.1 UEFI. I used it for the first time this week and had no issues figuring it out without reading any instructions. The only issue I has was the ‘large font’ version didn’t allow me to apply my changes but rebooting into the default setting worked just fine. I even got a taste of nostalgia with its old school Win3.11 vibe. ![]()
Here’s what I would do:
Unplug everything from your Vero other than the HDD you are looking to format.
On your Windows machine you need to SSH into your Vero.
Open up Windows PowerShell.
In PowerShell you need to connect to your Vero.
To do this you need to know your Vero’s IP address.
If you don’t know it already you can find it in your Vero settings (Home Screen > Settings > System Info > Network).
Back in PowerShell connect to the Vero by typing: ssh osmc@<ip address of your device>
Example:ssh osmc@192.168.1.6
The first time you do this it will ask you if you want to connect, say yes.
It won’t ask you again.
When it ask you for your password, type: osmc, then hit enter.
Don’t be thrown off that you don’t see the cursor move as you type, that is normal.
You should now be logged in to your Vero and see this:
osmc@osmc:~$ _Now type in df and hit enter.
You’ll get a listing of devices connected to your Vero that looks something like this:
Filesystem           1K-blocks       Used  Available Use% Mounted on
devtmpfs                774688          0     774688   0% /dev
tmpfs                   899236      49720     849516   6% /run
/dev/vero-nand/root   14499760   10163084    3577076  74% /
tmpfs                   899236          0     899236   0% /dev/shm
tmpfs                     5120          0       5120   0% /run/lock
tmpfs                   899236          0     899236   0% /sys/fs/cgroup
/dev/sda1           7811937256          0 7811937256   0% /
tmpfs                   179844          0     179844   0% /run/user/1000
If you only have the one USB HDD plugged in it should be /dev/sda1.
You’ll know which one it is because it has the largest amount of blocks.
Now we want unmount the drive so we can wipe it clean and format it.
Type in: sudo umount /dev/sda1
Now you’re ready to wipe it, type: sudo dd if=/dev/zero of=/dev/sda1 bs=1M count=64
Now create a partition, type: sudo fdisk /dev/sda
That get’s you in to fdisk.
Use d to delete all the partions.
Then use n to create a new partition.
It will ask you a few questions about how you want to create that partition, since we are not doing anything special, just use all the default values it suggests.
Now to apply everything you just did you need to write it to the disk by using w.
Now that you have a wiped HDD with a new partition you can finally due what you want to do, create a file system to your liking that uses up as little overhead space as possible.
You will use mkfs.ext4 to do this by typing: mkfs.ext4 /dev/sda1 -T largefile4 -m 1 -L <what ever you want to call your disk>
Now when picking your disk label, the value you put in after -L, it’s easiest to avoid spaces or long names.
If it’s too long, it will get truncated down to 16 characters and if you insist on using spaces then you need to put your label name in quotation marks like -L "Drive Name".
Now reboot the Vero by typing reboot.
After the Vero reboots, you should be good to go.
You can check by reconnecting to the Vero again and using df.
The Vero should automount it to /media/ like this:
Filesystem           1K-blocks       Used  Available Use% Mounted on
devtmpfs                774688          0     774688   0% /dev
tmpfs                   899236      16952     882284   2% /run
/dev/vero-nand/root   14499760   10157940    3582220  74% /
tmpfs                   899236          0     899236   0% /dev/shm
tmpfs                     5120          0       5120   0% /run/lock
tmpfs                   899236          0     899236   0% /sys/fs/cgroup
/dev/sdb2           7813894140 5989759300 1824134840  77% /media/Seagate Backup Plus Drive
/dev/sda1           7811937256 3535440728 4198339892  46% /media/Seagate8TB
/dev/sdc2           3906885628 2154123292 1752762336  56% /media/Seagate Backup Plus 4TB
/dev/sdd2           4883638268 1591420928 3292217340  33% /media/Seagate Backup Plus 5TB
tmpfs                   179844          0     179844   0% /run/user/1000
In my example above the Seagate8TB is my ext4 drive, the others with longer names and spaces are NTFS drives.
How did I find myself with 25TB of USB storage?
Thanks Vero!
thanks for taking the time to do that, just tried and got this message
ssh : The term ‘ssh’ is not recognized as the name of a cmdlet, function, script file, or operable program. Check the
spelling of the name, or if a path was included, verify that the path is correct and try again.
At line:1 char:1
- ssh osmc@192.168.0.25
-
  + CategoryInfo          : ObjectNotFound: (ssh:String) [], CommandNotFoundException
  + FullyQualifiedErrorId : CommandNotFoundException
From your previous posts it seems that you know how to use Putty. Use that instead.
Built-in SSH is only in Win10 and even that is fairly recent. With a current machine it does work well as it is just a matter of Win->cmd->ssh osmc@ip and your in.
tried using putty
when i get to command " Then use c to create a new partition"
c: unkown command
Command (m for help): m
So, what command is used to “add a new partition”?
Looks like it should be n.
If you put in m it will give you a list of available commands.
I guess it’s n for new not c for create.
Sorry.
I just SSH’d into my Vero and ran fdisk and it is in fact n, sorry for the mistake, I’ll correct it.
osmc@osmc:~$ sudo fdisk /dev/sde

Welcome to fdisk (util-linux 2.29.2).
Changes will remain in memory only, until you decide to write them.
Be careful before using the write command.


Command (m for help): m

Help:

  DOS (MBR)
   a   toggle a bootable flag
   b   edit nested BSD disklabel
   c   toggle the dos compatibility flag

  Generic
   d   delete a partition
   F   list free unpartitioned space
   l   list known partition types
   n   add a new partition
   p   print the partition table
   t   change a partition type
   v   verify the partition table
   i   print information about a partition

  Misc
   m   print this menu
   u   change display/entry units
   x   extra functionality (experts only)

  Script
   I   load disk layout from sfdisk script file
   O   dump disk layout to sfdisk script file

  Save & Exit
   w   write table to disk and exit
   q   quit without saving changes

  Create a new label
   g   create a new empty GPT partition table
   G   create a new empty SGI (IRIX) partition table
   o   create a new empty DOS partition table
s create a new empty Sun partition table@snewton1970, here is me doing a drive from start to finish.
In this example I use largefile instead of largefile4 because this particular drive is for TV episodes where my 8TB drive is for BD and UHD remuxes.
PS C:\Users\Omen> ssh osmc@192.168.50.226
osmc@192.168.50.226's password:
Linux osmc 3.14.29-152-osmc #1 SMP osmc-ccachefix aarch64

The programs included with the Debian GNU/Linux system are free software;
the exact distribution terms for each program are described in the
individual files in /usr/share/doc/*/copyright.

Debian GNU/Linux comes with ABSOLUTELY NO WARRANTY, to the extent
permitted by applicable law.
Last login: Tue Aug 20 22:09:40 2019 from 192.168.50.14
osmc@osmc:~$ df
Filesystem           1K-blocks     Used  Available Use% Mounted on
devtmpfs                774688        0     774688   0% /dev
tmpfs                   899236     8648     890588   1% /run
/dev/vero-nand/root   14499760 10260220    3479940  75% /
tmpfs                   899236        0     899236   0% /dev/shm
tmpfs                     5120        0       5120   0% /run/lock
tmpfs                   899236        0     899236   0% /sys/fs/cgroup
/dev/sda1           4881048100    90140 4832105192   1% /media/Seagate Backup Plus 5TB
tmpfs                   179844        0     179844   0% /run/user/1000
osmc@osmc:~$ sudo umount /dev/sda1
osmc@osmc:~$ sudo dd if=/dev/zero of=/dev/sda1 bs=1M count=64
64+0 records in
64+0 records out
67108864 bytes (67 MB, 64 MiB) copied, 2.14294 s, 31.3 MB/s
osmc@osmc:~$ sudo fdisk /dev/sda

Welcome to fdisk (util-linux 2.29.2).
Changes will remain in memory only, until you decide to write them.
Be careful before using the write command.


Command (m for help): d
Partition number (1,2, default 2): 2

Partition 2 has been deleted.

Command (m for help): d
Selected partition 1
Partition 1 has been deleted.

Command (m for help): F
Unpartitioned space /dev/sda: 4.6 TiB, 5000980012032 bytes, 9767539086 sectors
Units: sectors of 1 * 512 = 512 bytes
Sector size (logical/physical): 512 bytes / 4096 bytes

Start        End    Sectors  Size
 2048 9767541133 9767539086  4.6T

Command (m for help): n
Partition number (1-128, default 1): 1
First sector (34-9767541133, default 2048): 2048
Last sector, +sectors or +size{K,M,G,T,P} (2048-9767541133, default 9767541133): 9767541133

Created a new partition 1 of type 'Linux filesystem' and of size 4.6 TiB.

Command (m for help): w
The partition table has been altered.
Calling ioctl() to re-read partition table.
Syncing disks.

osmc@osmc:~$ mkfs.ext4 /dev/sda1 -T largefile -m 1 -L Seagate5TB
mke2fs 1.43.4 (31-Jan-2017)
Suggestion: Use Linux kernel >= 3.18 for improved stability of the metadata and journal checksum features.
Creating filesystem with 1220942385 4k blocks and 4769408 inodes
Filesystem UUID: 8f303397-fb67-4fe5-89f3-e5ea50d96ba2
Superblock backups stored on blocks:
        32768, 98304, 163840, 229376, 294912, 819200, 884736, 1605632, 2654208,
        4096000, 7962624, 11239424, 20480000, 23887872, 71663616, 78675968,
        102400000, 214990848, 512000000, 550731776, 644972544

Allocating group tables: done
Writing inode tables: done
Creating journal (262144 blocks): done
Writing superblocks and filesystem accounting information: done

osmc@osmc:~$ reboot
Connection to 192.168.50.226 closed by remote host.
Connection to 192.168.50.226 closed.
PS C:\Users\Omen> ssh osmc@192.168.50.226
osmc@192.168.50.226's password:
Linux osmc 3.14.29-152-osmc #1 SMP osmc-ccachefix aarch64

The programs included with the Debian GNU/Linux system are free software;
the exact distribution terms for each program are described in the
individual files in /usr/share/doc/*/copyright.

Debian GNU/Linux comes with ABSOLUTELY NO WARRANTY, to the extent
permitted by applicable law.
Last login: Tue Aug 20 22:11:39 2019 from 192.168.50.14
osmc@osmc:~$ df
Filesystem           1K-blocks     Used  Available Use% Mounted on
devtmpfs                774688        0     774688   0% /dev
tmpfs                   899236     8652     890584   1% /run
/dev/vero-nand/root   14499760 10260272    3479888  75% /
tmpfs                   899236        0     899236   0% /dev/shm
tmpfs                     5120        0       5120   0% /run/lock
tmpfs                   899236        0     899236   0% /sys/fs/cgroup
/dev/sda1           4881179132    90140 4832234916   1% /media/Seagate5TB
tmpfs                   179844        0     179844   0% /run/user/1000
osmc@osmc:~$
1 Like