Please write to HowTo my issue, I can’t don’t to do this.
My issue for routers based on DD-WRT.
-
Attach your USB storage to the router and power it up (if needed).
-
Enter your router config page by typing the router IP address (usually http://192.168.1.1/) into your browser address bar. Click on the ‘Services’ tab, and then the ‘USB’ tab.
-
Enable ‘Core USB Support’, ‘USB Storage Support’ and ‘Automatic Drive Mount’. If you have a spare USB port and want to connect a printer for wireless printing, you can enable ‘USB Printer support’ as well. Click ‘Save’ and then ‘Apply Settings’.
Learn how to protect your digital privacy and stay safe online - ProPrivacy -
Details about your USB storage device should appear in the ‘Disk Info’ section. If they don’t, then re-start the router and come back to this page.
-
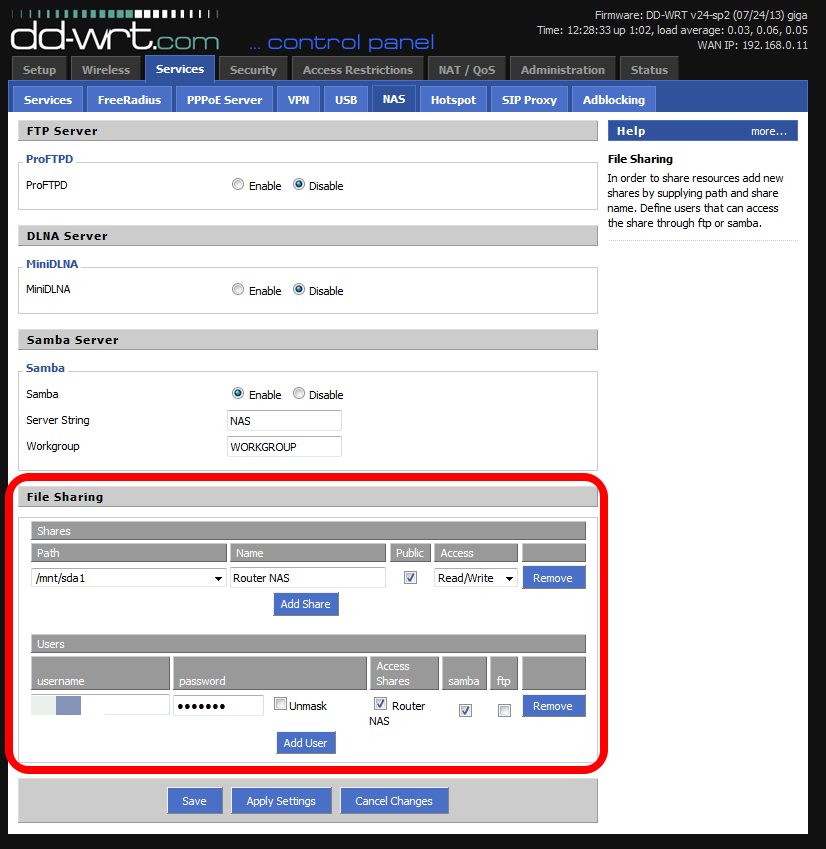
Click on the ‘NAS’ tab. We are going to use SAMBA for this, so ‘Enable’ it, choose a Server String (name), and add your Workgroup. To discover or change your workgroup:
In Windows go to Control Panel → System
In OSX go to System Preferences → Network → AirPort → Advanced → WINS
In Linux / Ubuntu to install Samba, open up a terminal window and issue the command: sudo apt-get install samba smbfs (you will need to enter your sudo password). Go to the /etc/samba/smb.config file and look for the line ‘workgroup = WORKGROUP’. -
Under ‘File Sharing’, click Add share, select a storage device or device partition from the ‘Path’ dropdown menu, and choose a name for the storage. If you want everyone who joins the network to be able to access the NAS storage then check ‘Public’, and decide whether permission is Read/Write or Read Only.
If you prefer to restrict access to named users then click ‘Add User’ and fill in the details, ensuring that ‘Samba’ is checked. Repeat for each authorized user (or less securely simply share a single User account details with all authorized users).
- Your NAS drive should now be accessible over your Network:
In Windows go to Start → Network → [Router name] → [drive or partition name]
In OSX go to File Manager → Shared pane or Network folder → -> [Router name] → [drive or partition name]