As explained in the OSMC Skin wiki article, the main menu of the OSMC Skin can be customized entirely.
The customization process via the main menu customization dialog might take some getting used to as it offers a lot of ways to tweak nearly every aspect of the main menu. With this how-to we’d like to acquaint you with the customization dialog and the different ways it allows you to adjust the OSMC Skin main menu to your taste and needs.
For a quick explanation how to get to the main menu customization dialog and what you have to do in order to enable the OSMC Skin main menu customization feature, please give the respective OSMC Skin wiki article section a quick read.
All changes made in the main menu customization dialog are saved instantaneously. They’ll be applied once you close the dialog and return to the main menu (indicated by a notification telling you Building menu…). Once this process is done, the main menu will reload with a short blank of your screen.
The main menu customization dialog
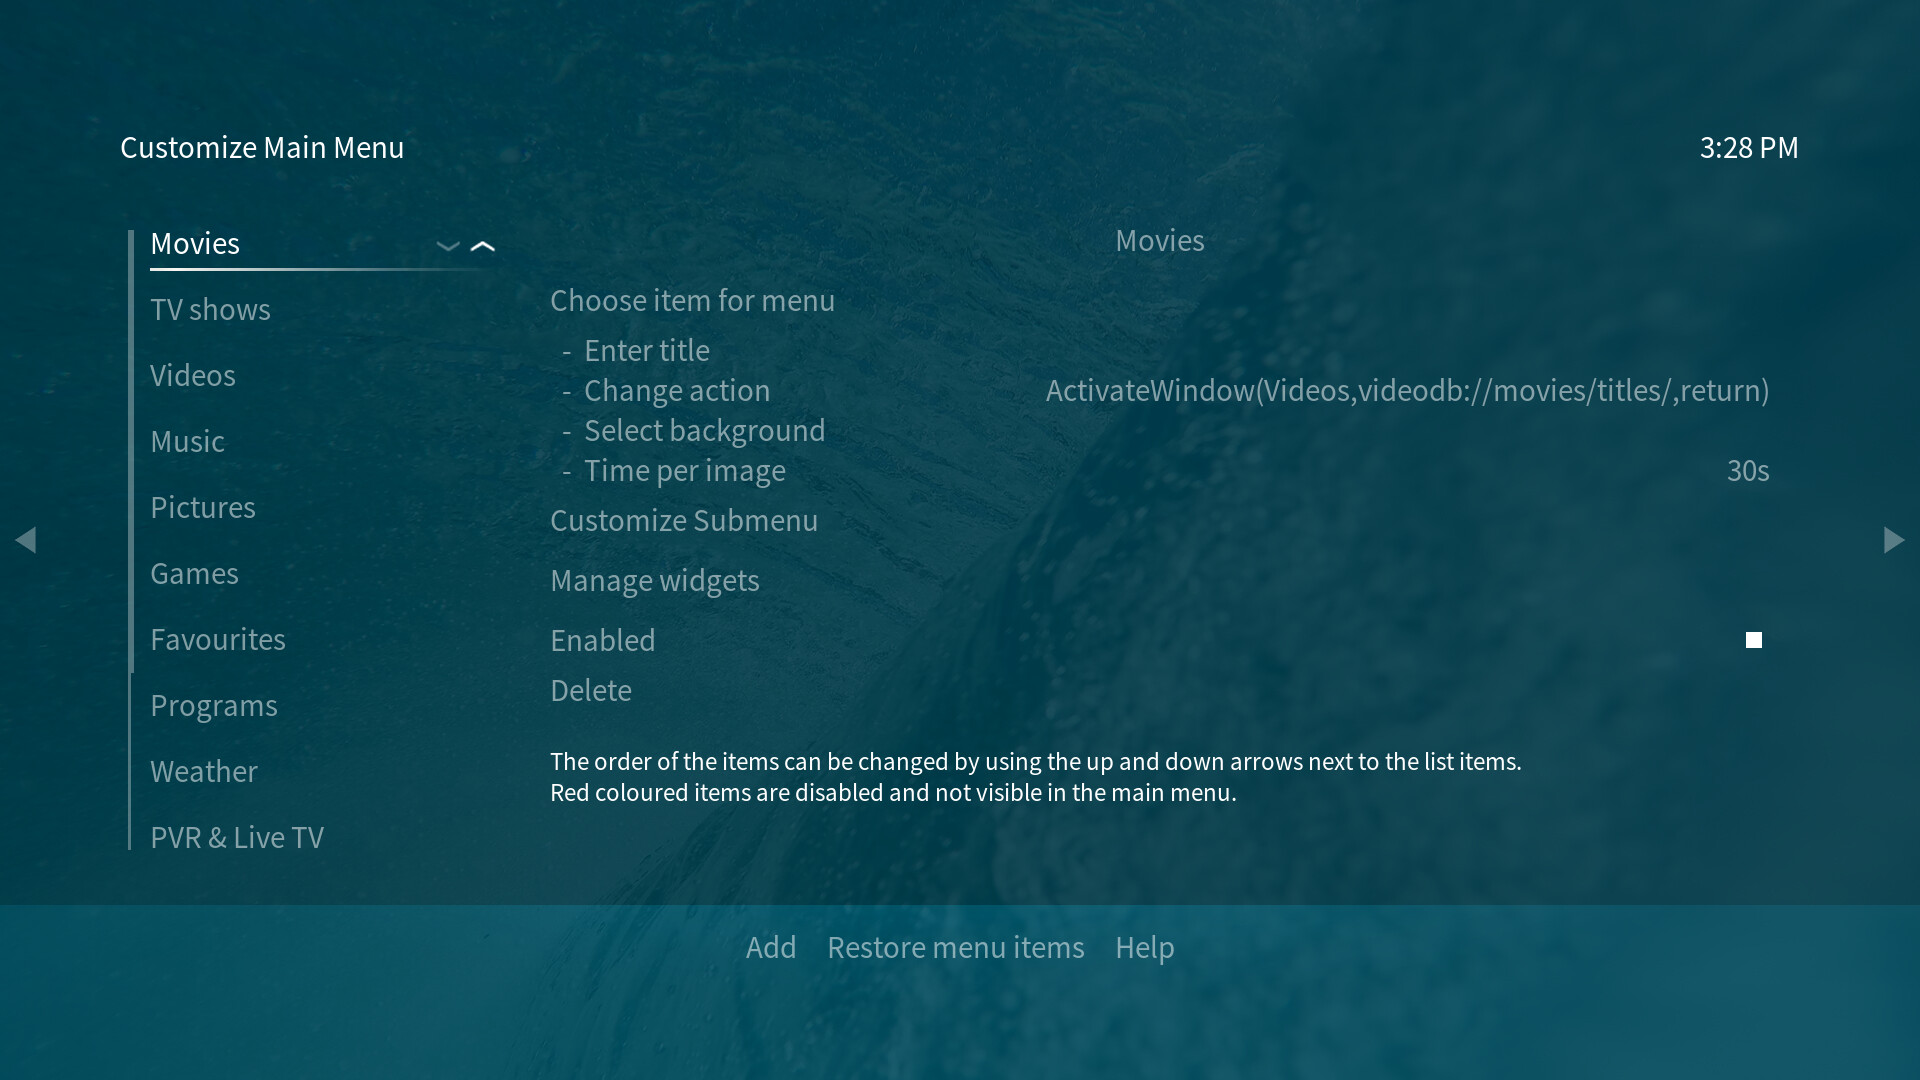
The main menu customization dialog mimics the look of the main menu. The list on the left side contains the main menu items also visible in the main menu. The right side offers customization options for each of the main menu items. Every main menu item you select on the left side will have the same options on the right side available to you. The order of the main menu items can be adjusted with the two small up and down arrows right of each focused main menu item.
The right side of the dialog contains specific options to edit the currently focused main menu item. This contains:
- selecting from a range of pre-defined actions and paths
- editing the title
- changing where the item points or what it does
- setting a background specifically shown for this main menu item
- adjusting the time each background image is shown for, if you select a folder as the image source
Next are links to additional dialogs that will let you customize the submenu belonging to the focused main menu item and the widget(s) next to the focused main menu item. The Enable option lets you hide an item from the main menu without having to delete it.
Adding a new main menu item or adjusting an existing one
Main menu items can either point to a path or perform a Kodi action.
- If you’d like to add a new main menu item, you first navigate to the Add button in the horizontal dialog button menu (see the OSMC Skin wiki). This will add a new, empty item to the left list.
- Navigate to the new, empty item in the left list and focus it.
- Navigate to the right side of the dialog.
- You’ve got two options for adjusting where the main menu item should point to or what it should do:
- click on Choose item for menu and select a pre-defined path or action from the dialog that will open.
- click on Change action, navigate to the bottom of the upcoming dialog and choose Custom item. This lets you manually input where the main menu item should point to or what it should do.
- Adjust/set the title of the created main menu item, if the pre-configured one isn’t fine or if you’ve manually set the main menu path/action.
All of these actions can also be applied to an existing main menu item that you’d like to adjust.
If you’d like to restore a formerly deleted, default main menu item, you may use the Restore menu items button in the horizontal dialog button menu and select whether you’d like to restore the entire list of main menu items (Reset to skin default) or whether you’d like to restore one specific main menu item (Restore an original menu item).
The submenu customization dialog
By clicking on Customize Submenu next to a focused main menu item in the main menu customization dialog, you’ll get to another customization which lets you set the submenu items of the focused main menu item.
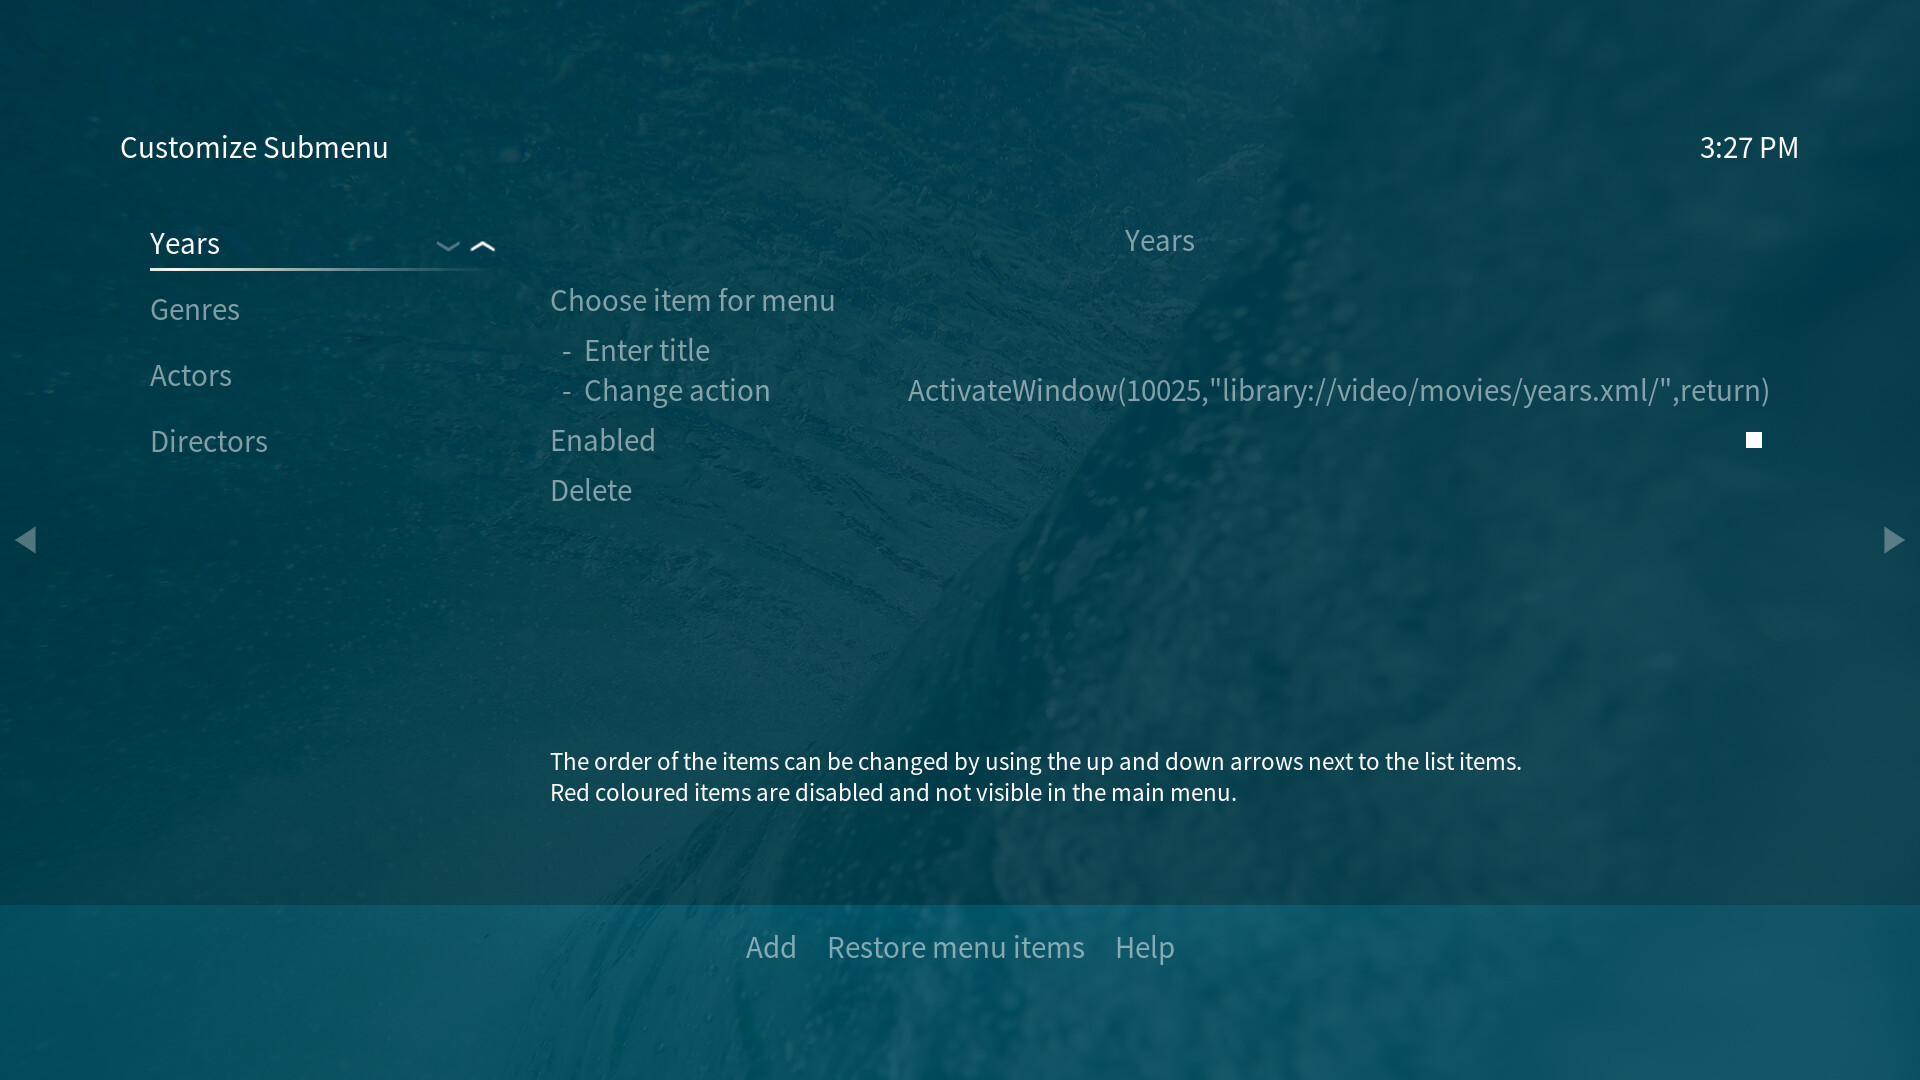
The submenu customization dialog mimics the the look of the submenu of the main menu item you’re currently adjusting. The submenu entries of that submenu are listed on the left side and on the the right side there’re options to adjust each submenu item.
The Enable option lets you hide an item from the submenu without having to to delete it.
Adding a new submenu item or adjusting an existing one
Submenu items can either point to a path or perform a Kodi action.
- If you’d like to add a new submenu item, you first navigate to the Add button in the horizontal dialog button menu (see the OSMC Skin wiki). This will add a new, empty item to the left list.
- Navigate to the new, empty item in the left list and focus it.
- Navigate to the right side of the dialog.
- You’ve got two options for adjusting where the submenu item should point to or what it should do:
- click on Choose item for menu and select a pre-defined path or action from the dialog that will open.
- click on Change action, navigate to the bottom of the upcoming dialog and choose Custom item. This lets you manually input where the submenu item should point to or what it should do.
- Adjust/set the title of the created submenu item, if the pre-configured one isn’t fine or if you’ve manually set the submenu path/action.
All of these actions can also be applied to an existing submenu item that you’d like to adjust.
If you’d like to restore a formerly deleted, default submenu item, you may use the Restore menu items button in the horizontal dialog button menu and select whether you’d like to restore the entire list of main menu items (Reset to skin default) or whether you’d like to restore one specific submenu item (Restore an original item).
The widget customization dialog
Any number of widgets can be added to each main menu item. You can toggle through those widgets by using the up and down buttons of your remote or keyboard. Just keep in mind that only one widget will be shown next to each main menu item at a time.
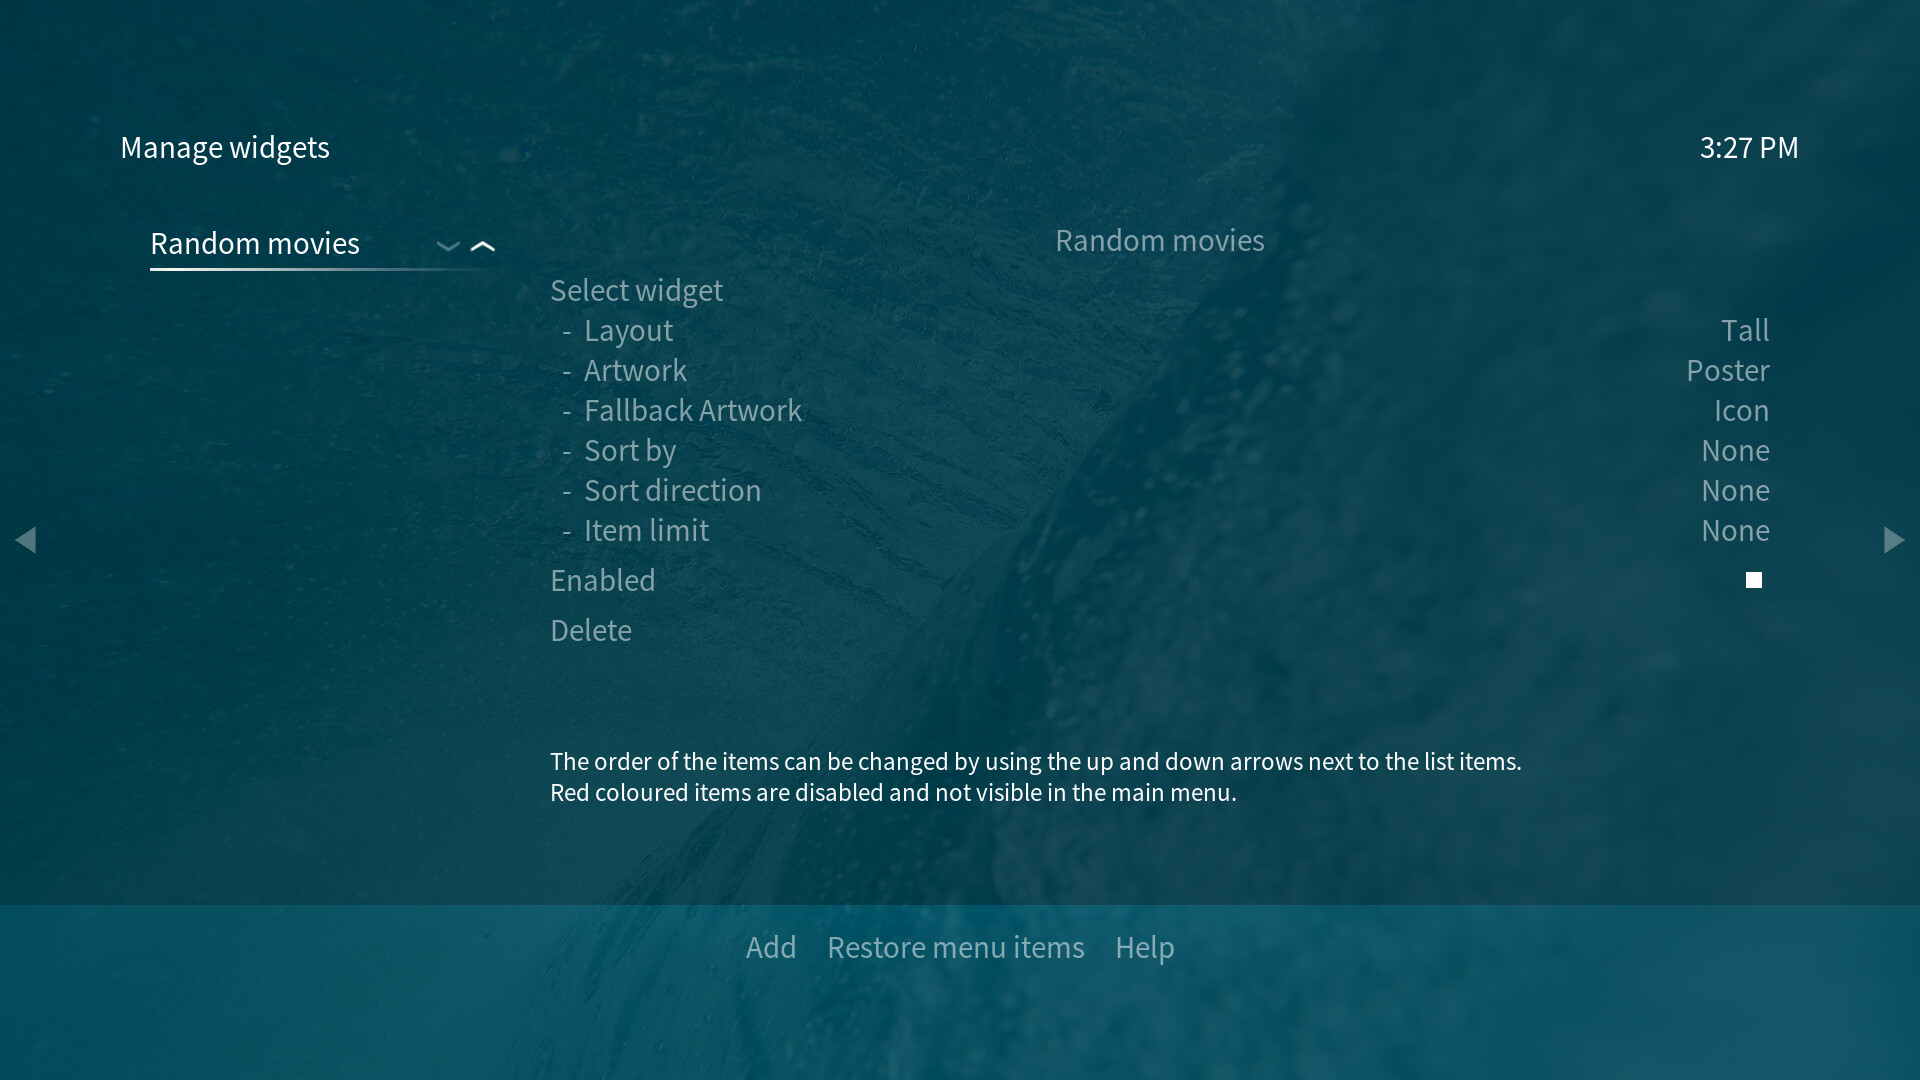
The widget customization dialog mimics the widgets available next to the currently selected main menu item. The list on the left side contains the widgets visible next to the main menu item. The right side offers customization options for each of the widgets. Every widget you select on the left side will have the same options on the right side available to you. The order of the widgets can be adjusted with the two small up and down arrows left of each focused widget.
The right side of the dialog contains specific options to edit the currently focused widget. This contains:
- selecting from a range of pre-defined widgets and widget paths as well as setting a custom widget path
- changing the layout of the widget (the aspect ratio of each widget icon and thus the amount of icons shown in each widget on screen)
- setting the type of artwork used as widget icon art
- setting the type of fallback artwork used as widget icon art, if the artwork selected type above isn’t returning a valid image
- adjusting the sort key used to sort the content of the widget
- adjusting the sort direction of the widget content
- setting a limit to how many items the widget should contain
The Enable option lets you hide a widget from the main menu item without having to delete it.
Adding a new widget or adjusting an existing one
Widgets can only point to a path.
- If you’d like to add a new widget, you first naviagte to the Add button in the horizontal dialog button menu (see the OSMC Skin wiki). This will add a new, empty widget to the left list.
- Navigate to the new, empty widget in the left list and focus it.
- Navigate to the right side of the dialog.
- Choose from a list of pre-defined widgets and paths or set a custom widget path by clicking on Select widget.
- Adjust/set the title of the created widget, if the pre-configured one isn’t fine or if you’ve manually set the widget path.
- Adjust the layout, artwork, sort key or direction and item limit, if necessary.
All of these actions can also be applied to an existing widget that you’d like to adjust.
If you’d like to restore a formerly deleted, default widget, you may use the Restore menu items button in the horizontal dialog button menu. As the OSMC Skin’s default main menu layout only features single widgets per main menu item, it makes no difference whether you select Reset to skin default or Restore an original menu item.
Add special paths (or actions) as main menu/submenu items or widgets
Smart playlists
If the offered pre-configured main menu/submenu items or widgets don’t point to the exact path or part of your library you want, we recommend looking into smart playlists. Kodi’s smart playlists can be used to filter your library for special items, set limits, sort orders, etc. After creating a smart playlist for videos or music you can select these in the customization dialogs via the Videos or Music folders and the respective Playlists directories.
Special Kodi windows or paths (or actions)
Another way to add special windows, paths or actions that are not available as pre-configured main menu/submenu items or widgets in the customization dialogs, is to choose the option to manually add an item and type in the window ID or path (in the ActivateWindow() format) or a special Kodi action.