I recently had my micro sd card switch itself to read only, I think because of continual database updates from all the additional servers i run on my pi. Simple solution would be to move /home/osmc onto my external hdd, but how? I don’t have a spare partition, but could symlink /home/osmc to /media/hdd1/osmc or use a bind mount in /etc/fstab, or usermod -d /media/hdd1/osmc osmc
What’s the “best” way to do this?
There was a previous question about this in the forum, where Sam suggested using /etc/fstab but no details on how or why.
Whichever method is used, where do i put the command so it takes effect before the osmc user is logged in?
A maybe stupid question, but would the most elegant solution not be to simply boot directly from hdd? 
Would be fine with me, but how do I migrate my working system to the hdd, don’t really want to reinstall all the servers (sonarr. transmission, lazylibrarian, calibre, couchpotato, sabnzbd) if I can simply move the configs across, all are in /home/osmc/
A possible approach might be to create a partition on the hdd which is as large or larger than the root partition on your SD card. Then clone the full root partition from the card to the new partition using dd.
Run lsblk from a console. The output will look something like this, even shorter on a typical single boot system. You can identify the correct source device by the mountpoint being only “/”.
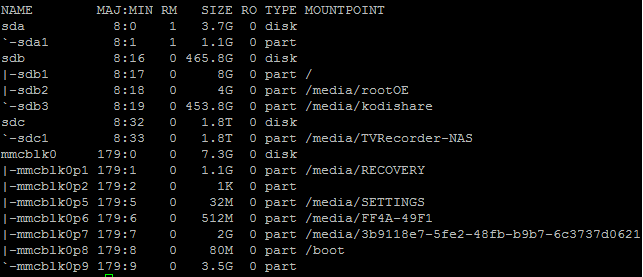
Note the names of your root partition and the target hdd from this list. Better double check the target partition – dd will kill all previous files there!
In the console run dd if=/source of=/target bs=1M replacing source with the partition on your SD and target with the new hdd. Usually this would be “dd if=/dev/mmcblk0p2 of=/dev/sda1 bs=1M” but again: be very carefull with the target. This may take a few minutes and look like the console froze. It did not, just don’t close it.
Booting from USB, I strongly recommend using label or UUID as an identifier. For that you need to create a label on your new root partition i.e. with the command e2label /dev/sda1 rootOSMC in the console.
After copying, you need to go to the boot partition cd /boot and edit the files cmdline.txt and os_config.json.
The cmdline.txt should contain only one line being something like this
root=/dev/mmcblkp2 osmcdev=rbp2 rootfstype=ext4 rootwait quiet
Change the part root= to point to the hdd.
The file will then look like
root=LABEL=rootOSMC osmcdev=rbp2 rootfstype=ext4 rootwait quiet
In the os_config.json similarly edit
{
“description” : “”,
“flavour” : “OSMC_Pi2”,
“imagefolder” : “/settings/os/OSMC_Pi2”,
“keyboard” : “de”,
“language” : “de”,
“partitions” : [
“/dev/mmcblk0p1”,
“/dev/mmcblk0p2”
],
“release_date” : “”,
“videomode” : 0
}
to
…
“partitions” : [
“/dev/mmcblk0p1”,
“LABEL=rootOSMC”
…
After a reboot your full system with all programs and configs will be running from the hdd. Another call of lsblk will show the hdd mounted to root (just “/”) as in the screenshot above. No further adjustments whatsoever needed. ![]()
Nice comprehensive solution, thanks.
I will look into repartitioning my external hdd and booting from that. Has the added advantage that I only need a small micro SD card, 1gb should be plenty.
Always glad to help! 
BTW you can also set input or output of dd to a file so with
dd if=/dev/sda1 of=/some/backup/folder/file.name bs=1M
you can create full system backups which can then at any time be swaped in with
dd if=/some/backup/folder/file.name of=/dev/sda1 1 bs=1M
or good ol Win32DiskImager.
This is quite handy if you want to try out some new program or setting that could possibly wreck havock on your system.