so the driver is configured wrong? how can i fix it
I think that confirms it, yes.
Well, Hyperion is getting the same results as the other software on other platforms. Unless they are all configured incorrectly.
I take it the kit looks different to the photos, if you can actually see you’ve received an Arduino (or some Arduino clone, which is much more likely).
If that is the case there will be a program (a “sketch”) running on it to interpret the signals over USB. In my limited experience we can’t reconfigure it in place or even read what is already there. Only overwrite it with a new sketch.
The sketches that I’ve seen all define the baudrate used.
They also pre-set the type of LEDs you are using and the number of them in the strip. If either of those are set incorrectly the results would be weird. So your box/driver may not match the strip you’ve been sent. If the company does other kits/combinations there may have been a mix up.
You’d need to read up on the specific chip on your board for how to flash it with the new sketch - and note that it is a one way process - you cannot back up what is there already.
ok thank you. i will open the box and upload a photo of it. maybe we can see what chip it is

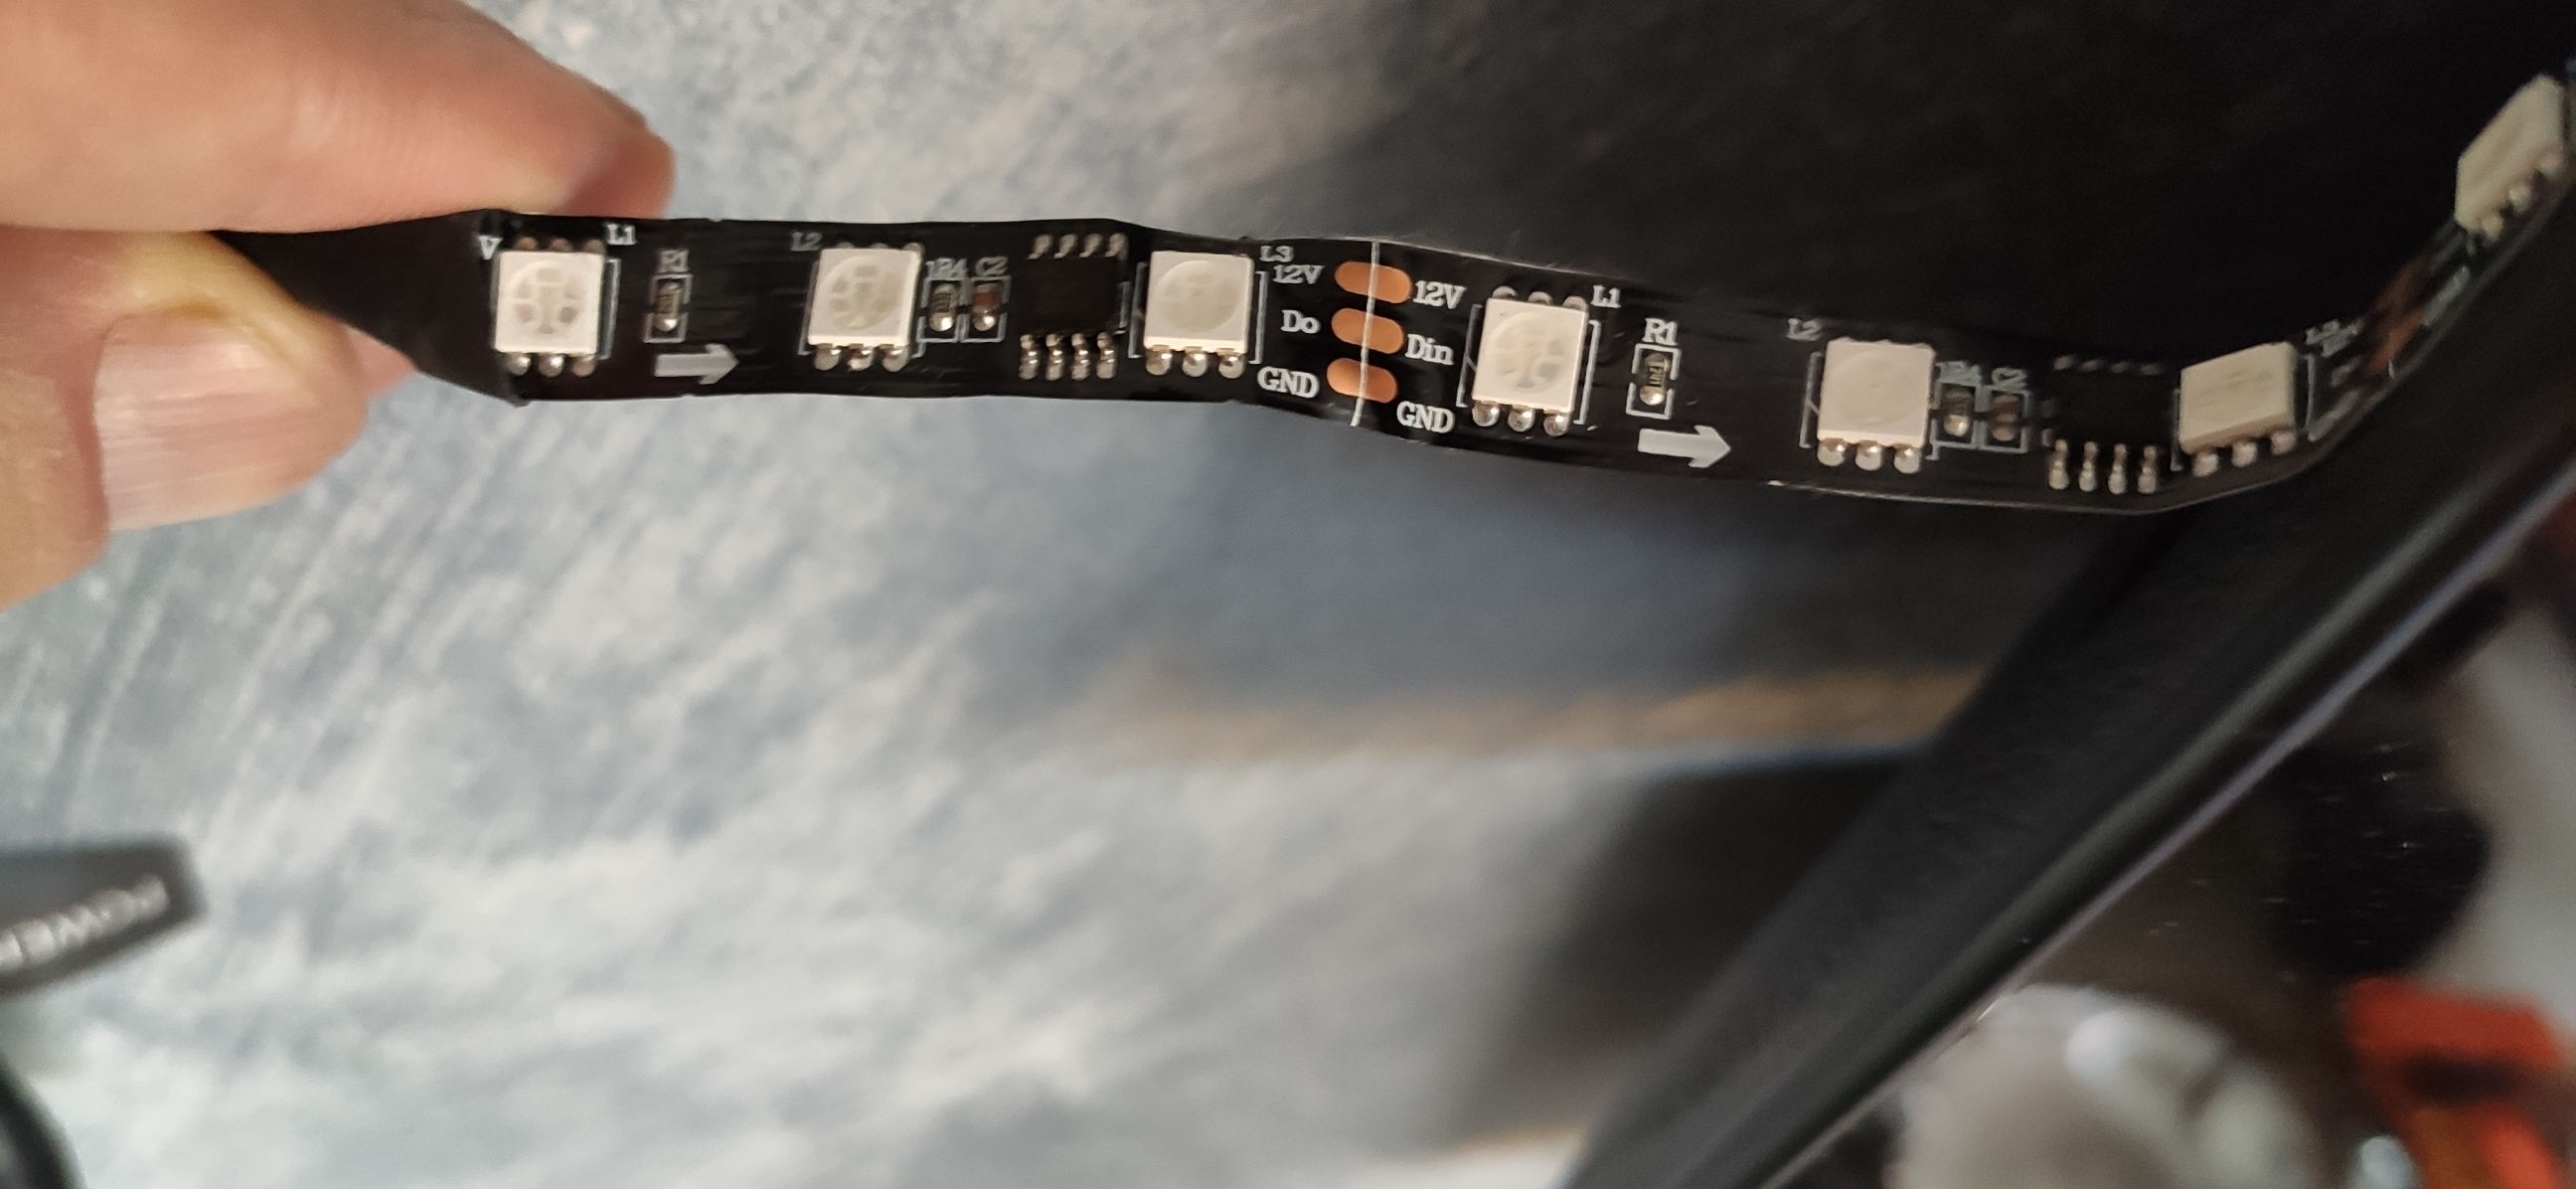
thats my Led strip. is this WS2812B?
the manufactur wrote this to me
Please read the manual carefully, the model you purchased is DN series
and sent this pictures

The driver unit looks nothing like the one in the listing you posted, but that box does have an Arduino clone of some sort in it. Hard to say what it would advertise itself as. Maybe as a Leonardo.
The tape is not one I am familiar with. It looks like they are colour 5050 LEDs, but I can’t see what the controlling chip is there. What is odd is that there is only 1 chip for every 3 LEDs. I assume that each individual 5050 can produce all the colours, but that all 3 in a section must show the same colour as each other.
This would mean each LED is not independently addressable, but clusters of 3 instead. The effect will be lower resolution, but should still work.
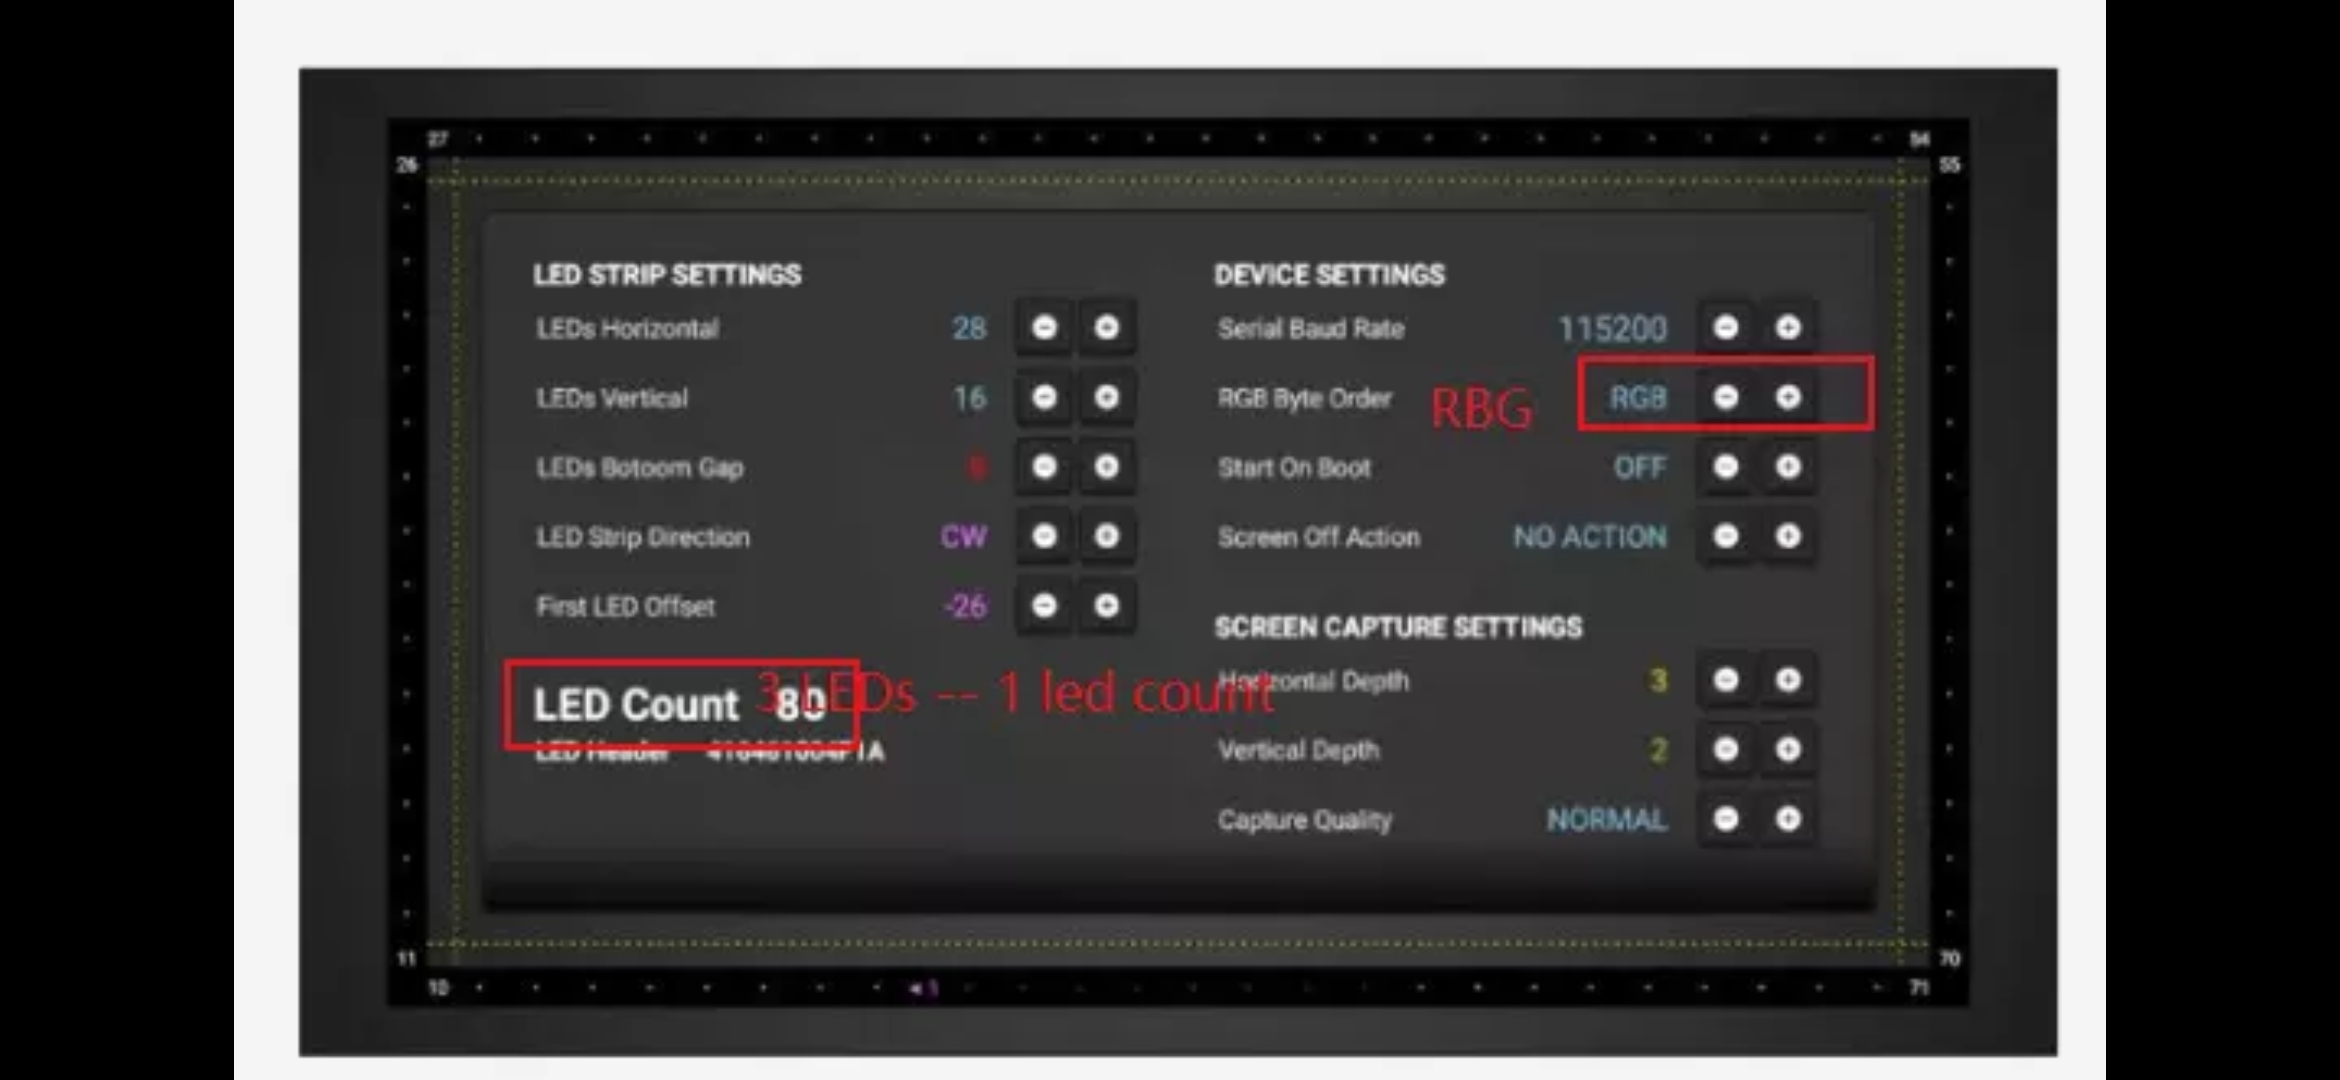
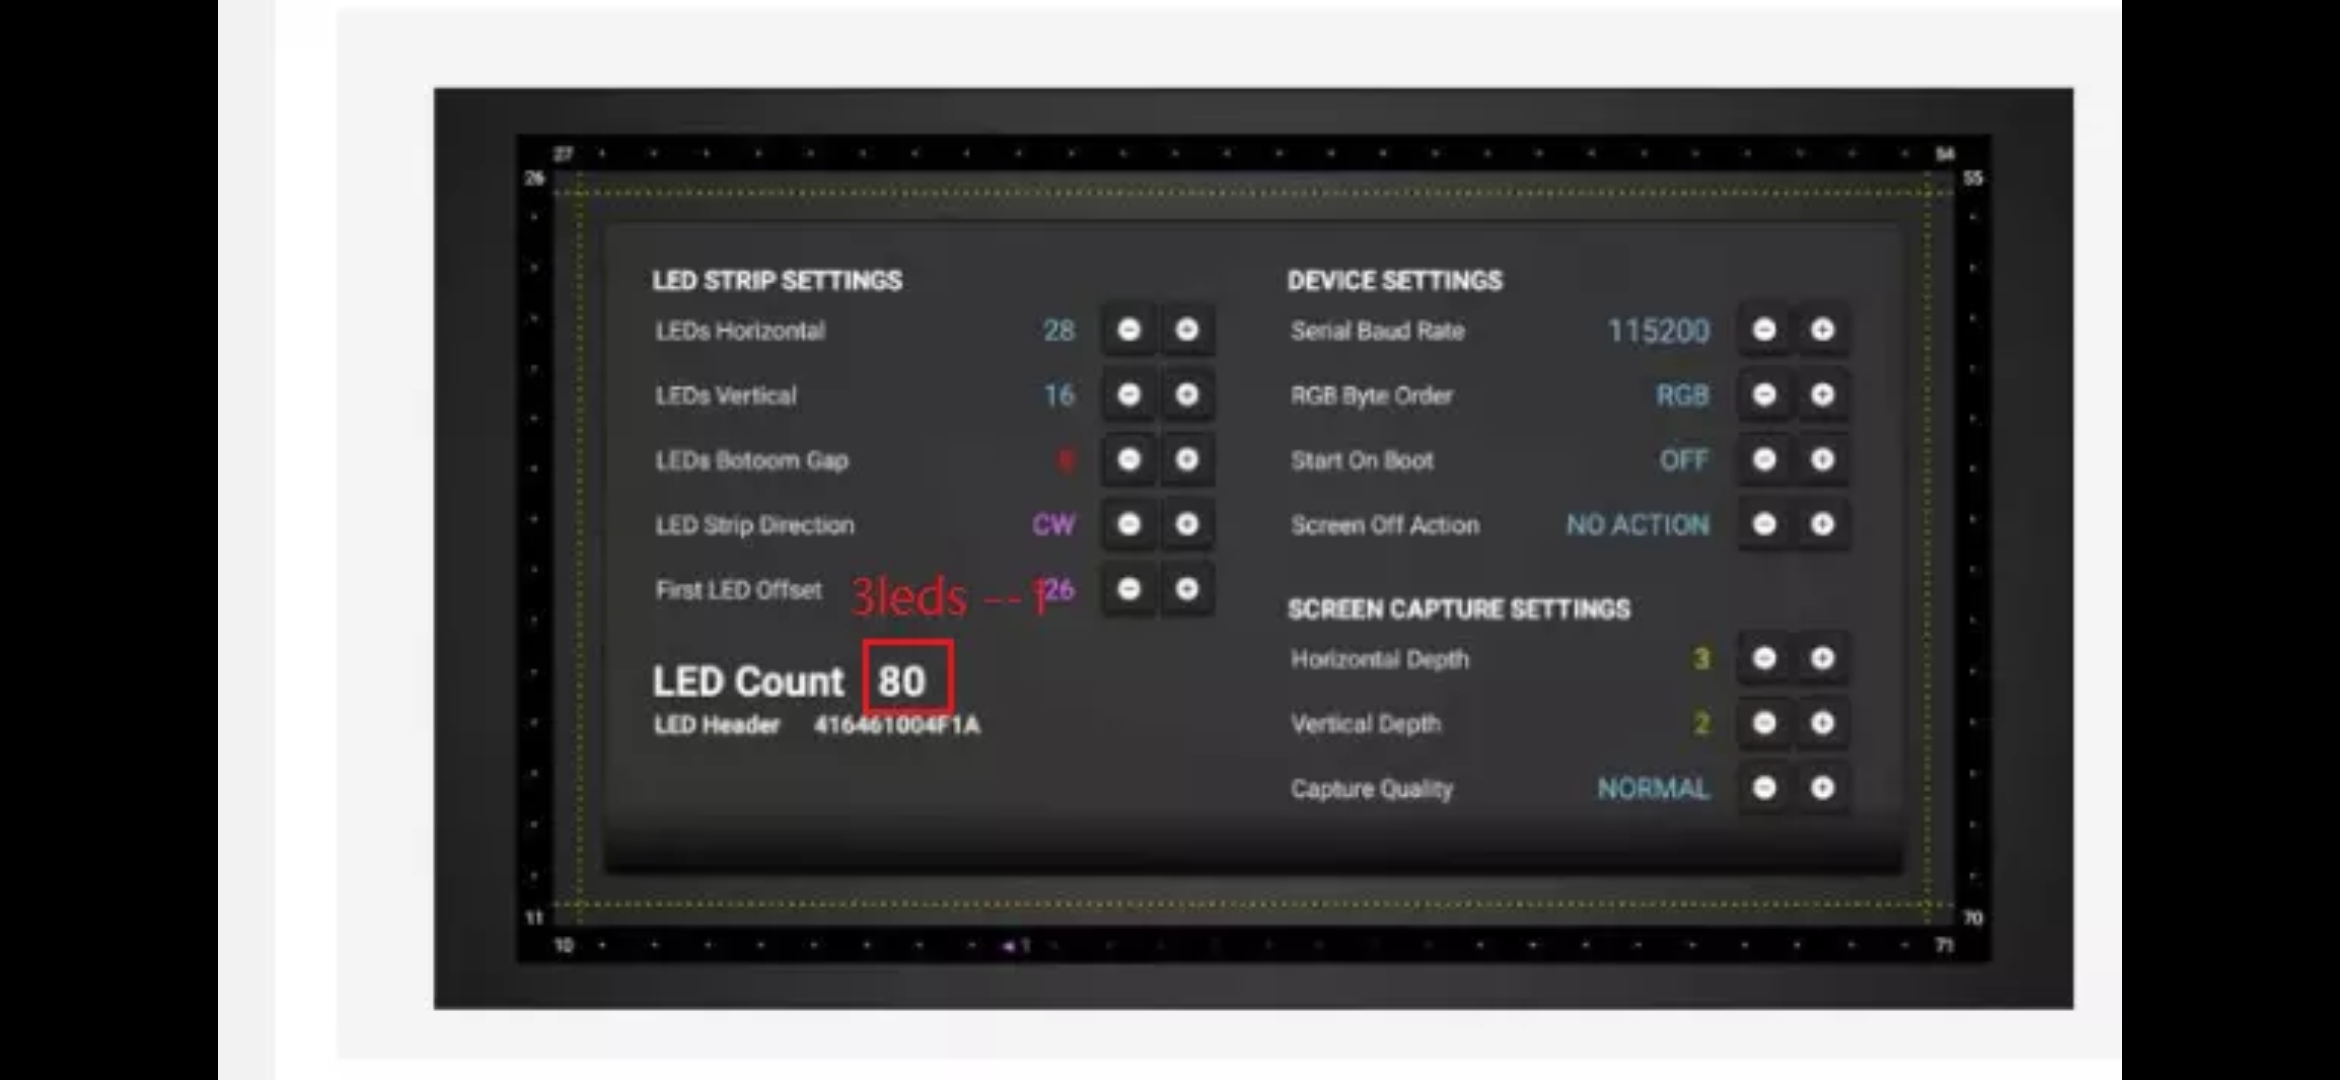
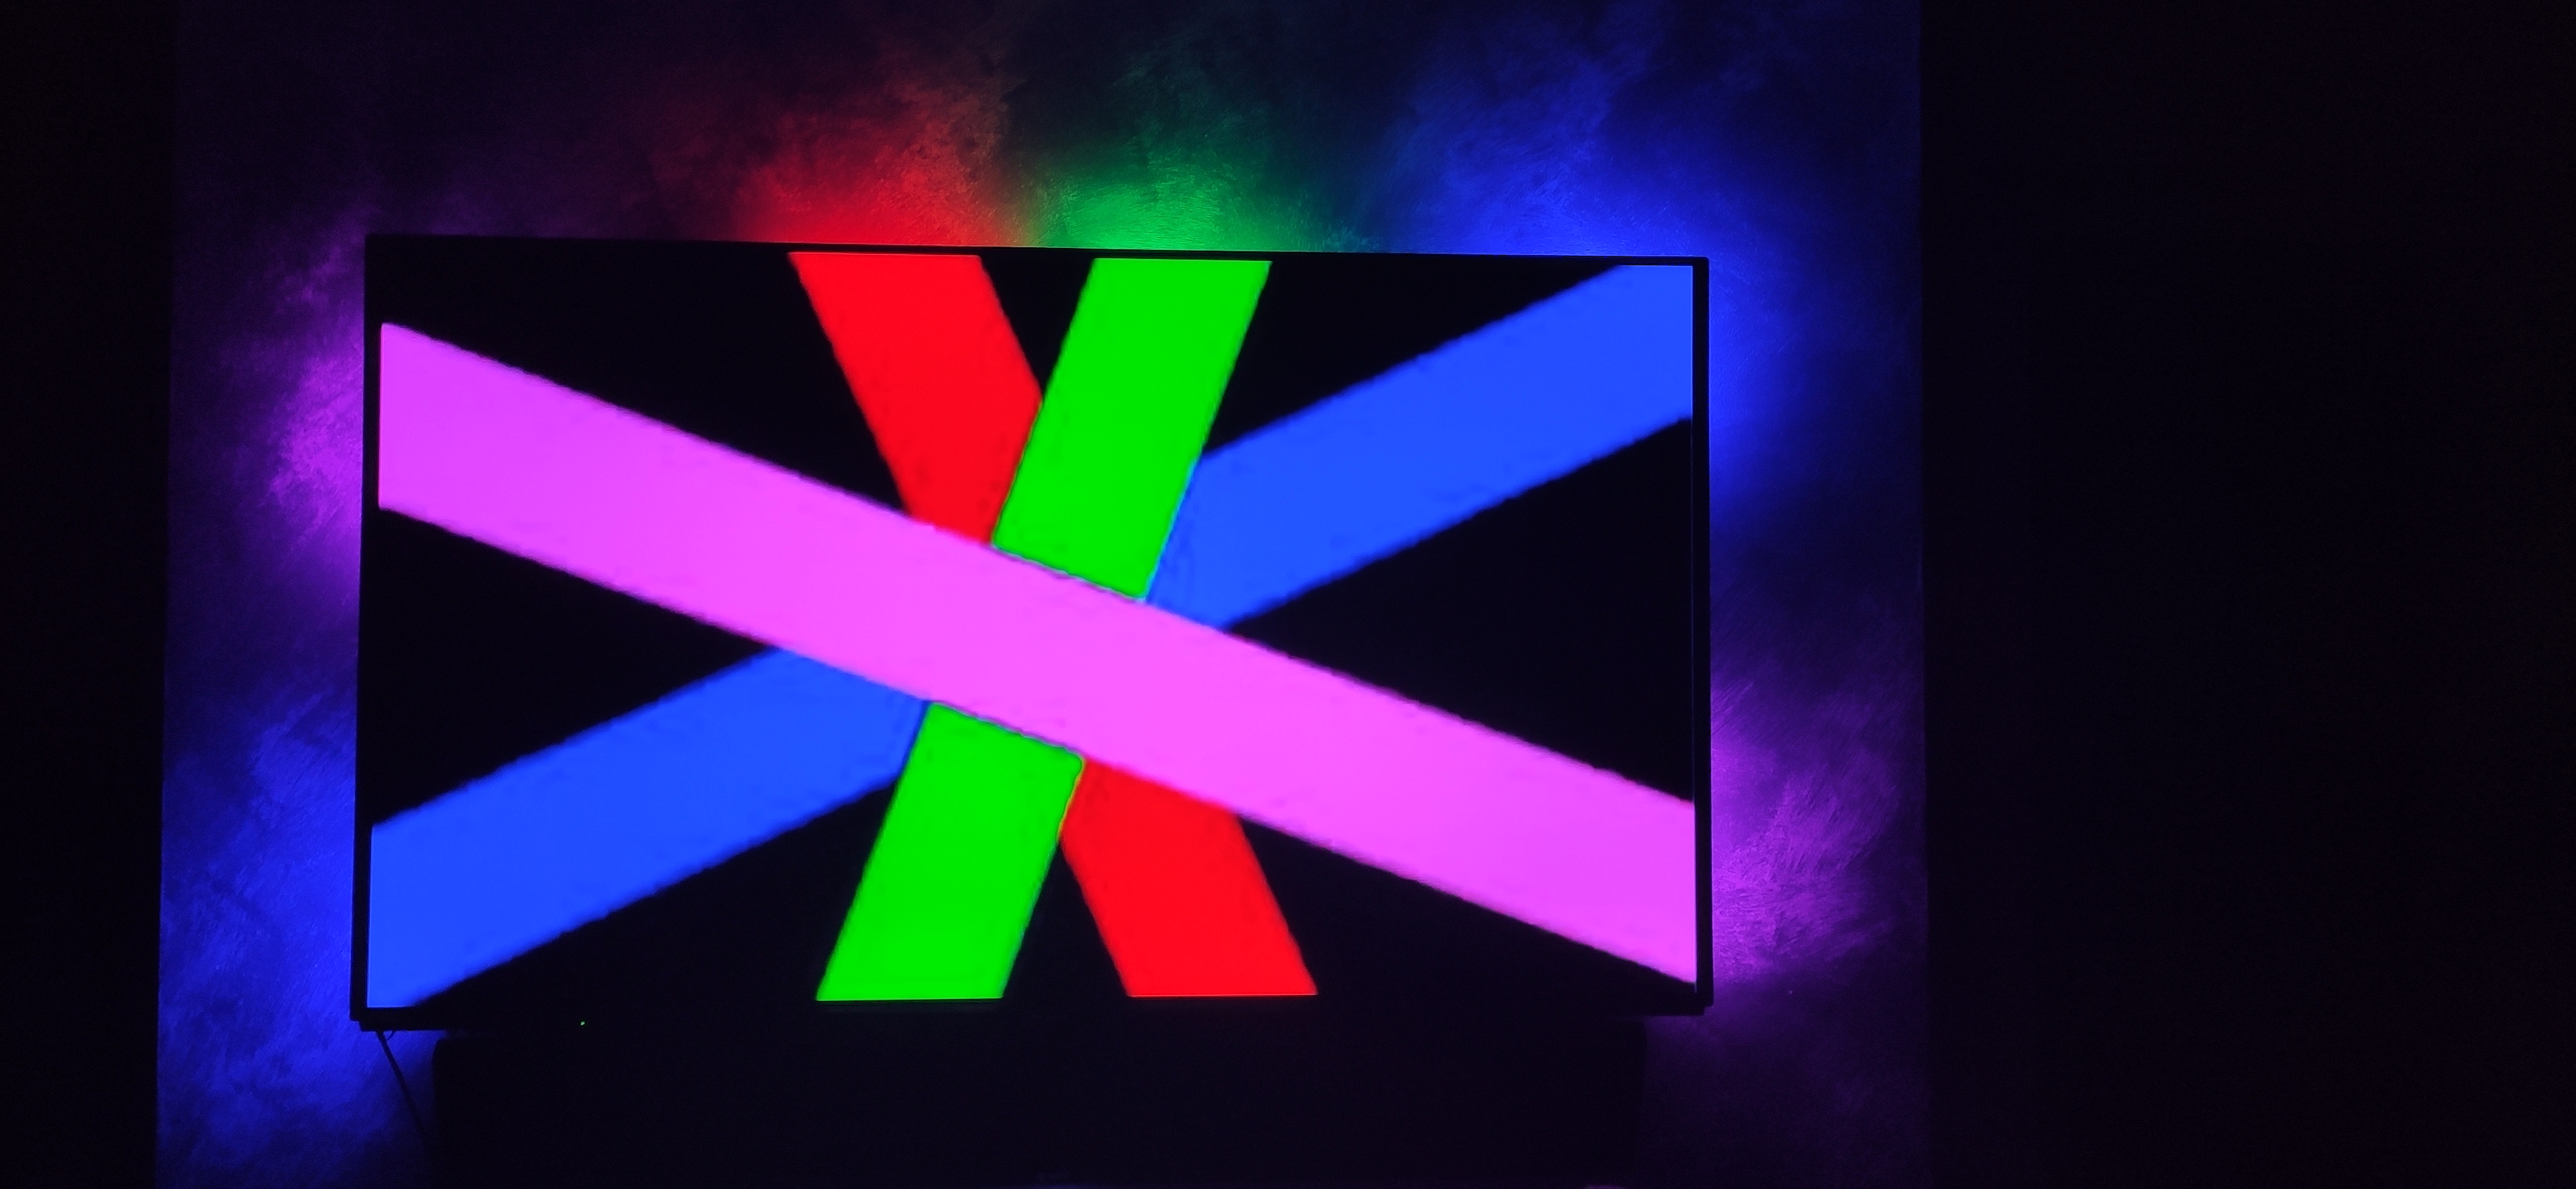
Your config needs to change so that it lists the number of CHIPS on each side of the TV, and NOT the number of LEDs. That explains why your colours were mapped the way they were.
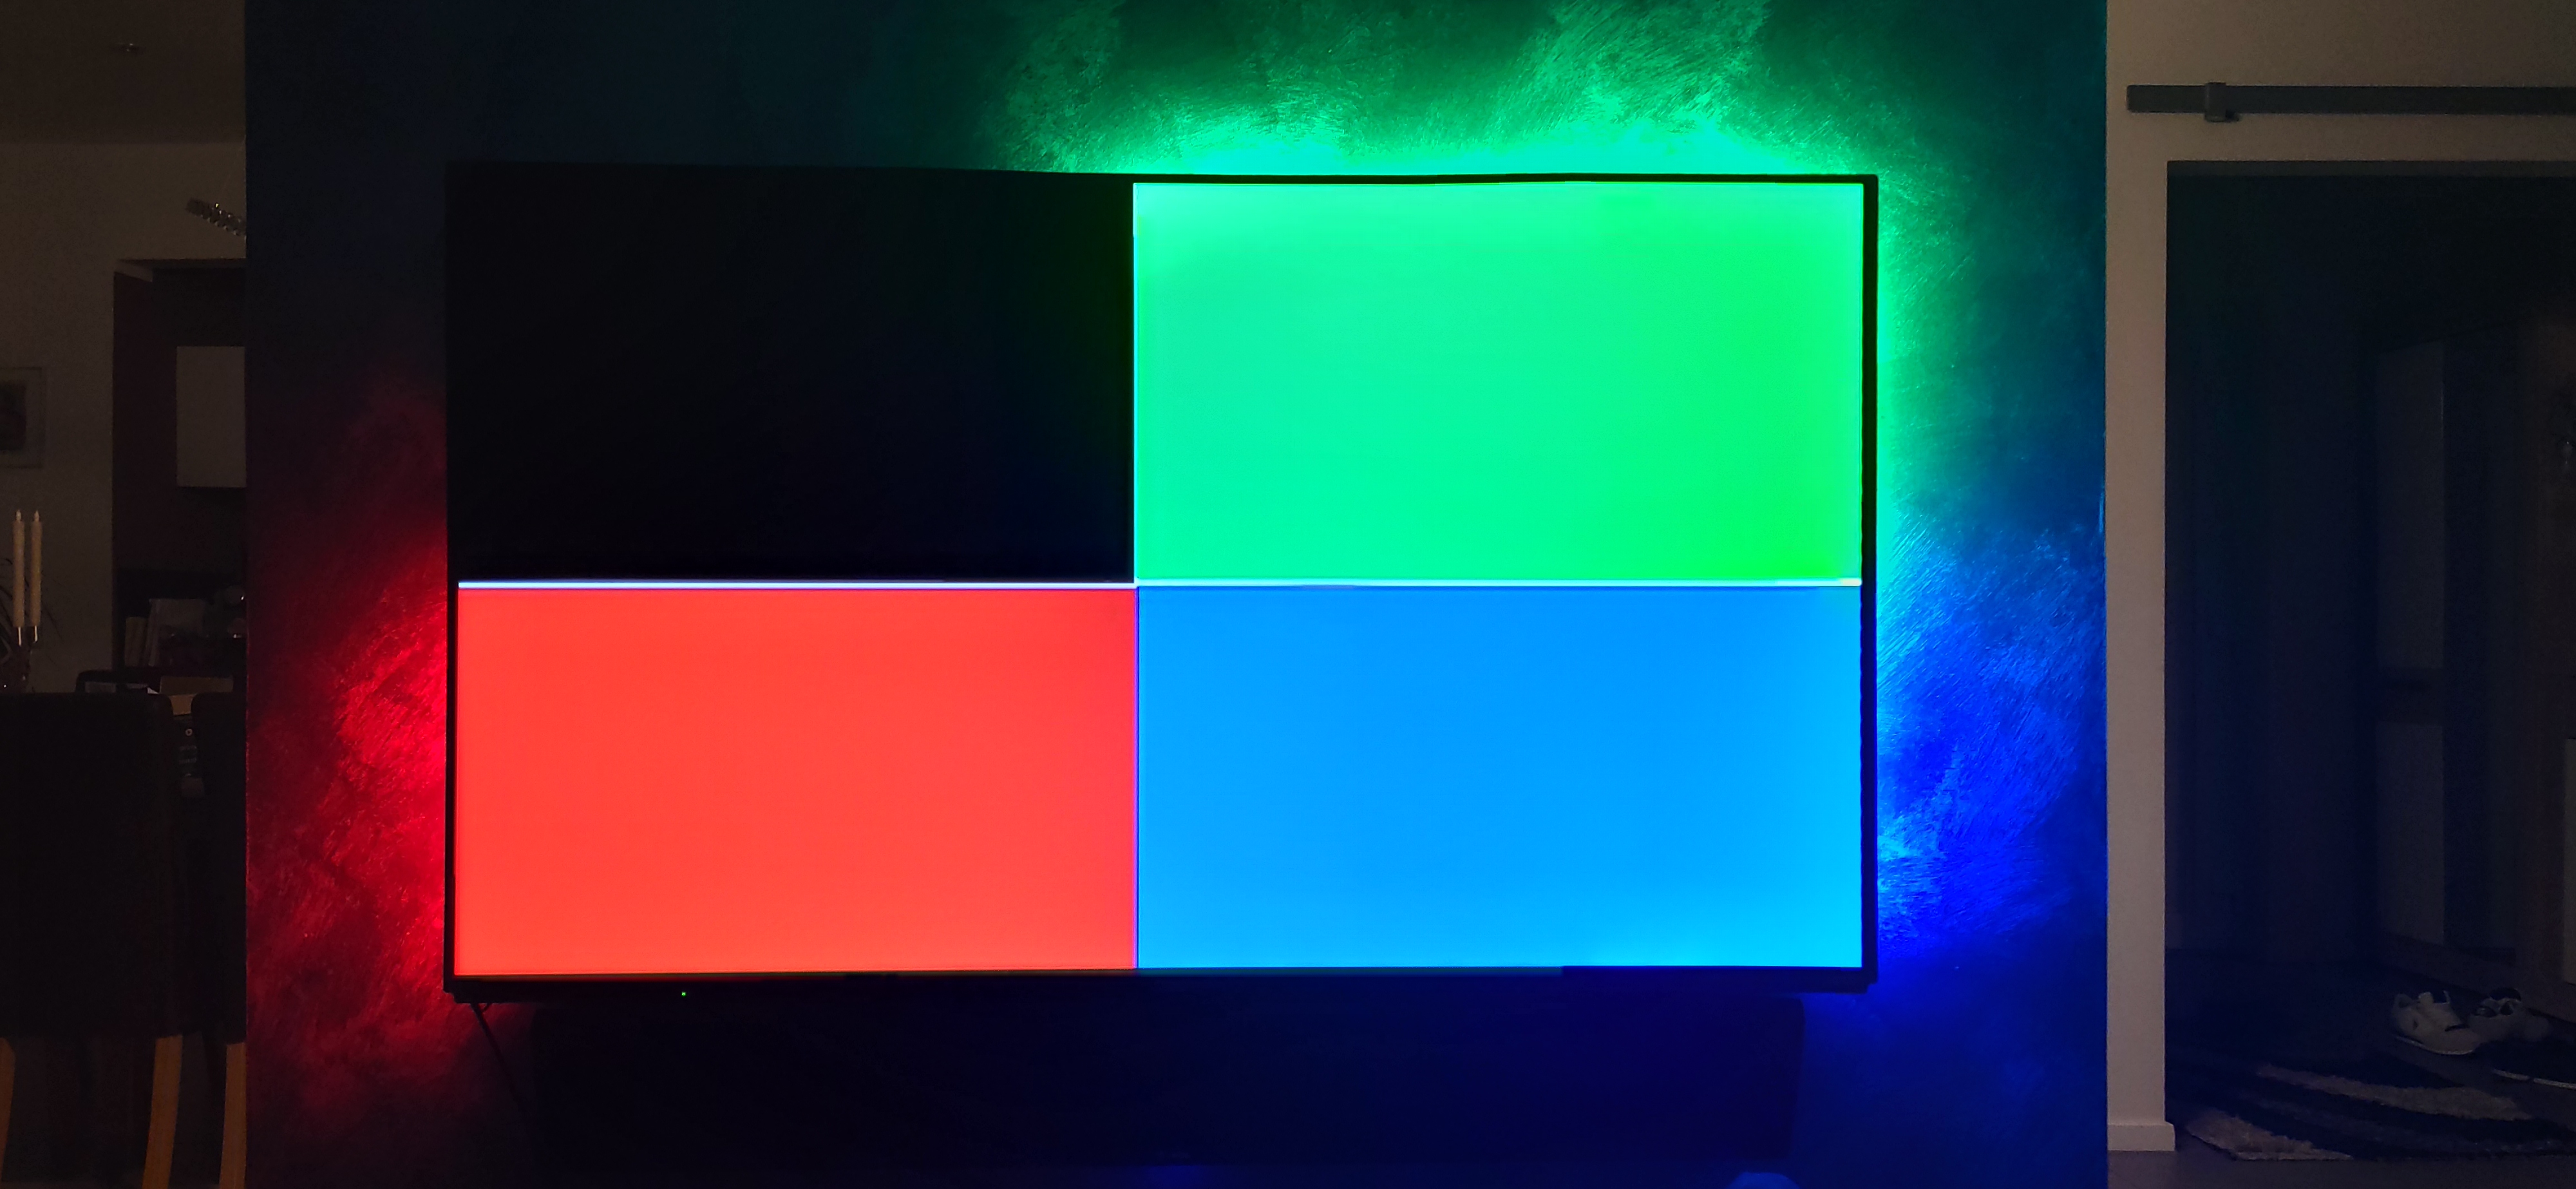
so now made the configuration and it works.
Thank you for your help and patience


Is there any kind of addon or something like that that can be switched on and off in the Ambilight?
I use a phone app to control it instead. It’s the most convenient way to change the overall colour, choose effects or switch to grabbing.
The official Hyperion Android app is what I use. You press the power button on the top right to use the grabber.
To turn it all off you could just side the brightness down to zero. (Personally I have an SSH script from the phone to stop the server and trigger a relay to cut power to the transformer brick, but each to their own.)
What is the SSH code for shutdown hyperion?
i connected the App. i can change the colors, but the shutdown not work, if I press the power button in the app
As above - the “power button” selects grabbing, so the colours match the screen. Selecting an effect or a solid colour from the wheel stops grabbing.
To turn the lights off via the app it’s easiest to just lower the brightness on the slider to 0. It shouldn’t really matter if the server is running in the background.
But if you do want to stop the server it is just the reverse of the startup commands from earlier, i.e. sudo systemctl stop hyperion
ah ok. thank you very much. 
Stupid question but I can’t seem to find an answer in all 771 posts above…
I’m currently using a lightberry kit ( the lightberry kit 5 - it does 4K/HDR/HDCP grabbing etc). However, it’s not the most stable and I’m pretty sure it’s the cause of some of my intermittent CEC/resolution/HDR changes – So I’d like to remove the grabber.
The current set up is…
Vero>HDMI>Denon AVR >HDMI>Lightberry HDMI grabber>HDMI>TV.
                                      |(USB)
                                     RPi
                                      |(USB)
                                     LEDS
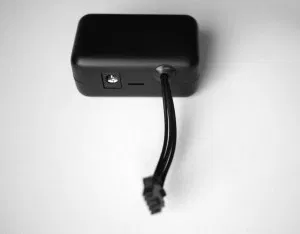
The RPi is connected to the LED strip via USB with one of these things… (came in the Lightberry box)
So question…
Can I use the install script from Hissingshark to set up the Vero4K+ to do the image grabbing… but also run Hyperion on the Vero4K+ as well? Or do I still need the RPi?
Hopefully I can do something like this?
Vero>HDMI>Denon AVR >HDMI>TV
 |(USB)
LEDS
I’m aware this will now mean all other sources into the Denon wont get LED back lighting but I’ll take that over the issues I’m having any day!
I can’t find images or proper specs on the Lightberry site of the kit contents, but it sounds like there is another box that is a HDMI grabber with passthrough, and that connects to an RPi running Hyperion, into which you also plug in the LED driver box in the photo above.
Is that correct? If so, you’d just need to install Hyperion on the Vero with the script and configure it over the webGUI. The problem is not knowing the contents of that driver box so you can configure it. It’s likely an Arduino clone masquerading as an “Adalight”. Baudrate unknown. I may be able to work something out from the source of their Kodi addon (config creator?)
We’d also need the specs of the LED strip - exact type, number of them.
Hey,
So I’m trying to not use the lightberry grabber etc any more - just the LED->USB box and then hopefully run it all locally on the Vero?
I believe the lights are APA102 (pulled from https://lightberry.eu/getting-started/) - annoyingly as they look like they’ve gone out of business now I can’t seem to find what specifically came in the box to confirm.
"device": {
    "colorOrder": "bgr",
    "rate": 500000,
    "type": "adalightapa102",
    "name": "MyPi",
    "output": "/dev/ttyACM0"
},
Looks like you’ve got everything you need there. So use the installer. Should be fairly self explanatory when you get into the webGUI.
When you configure select Adalight as the LED device and tick the APA102 box.
500000 is the baud rate.
/dev/ttyACM0 is the serial path.
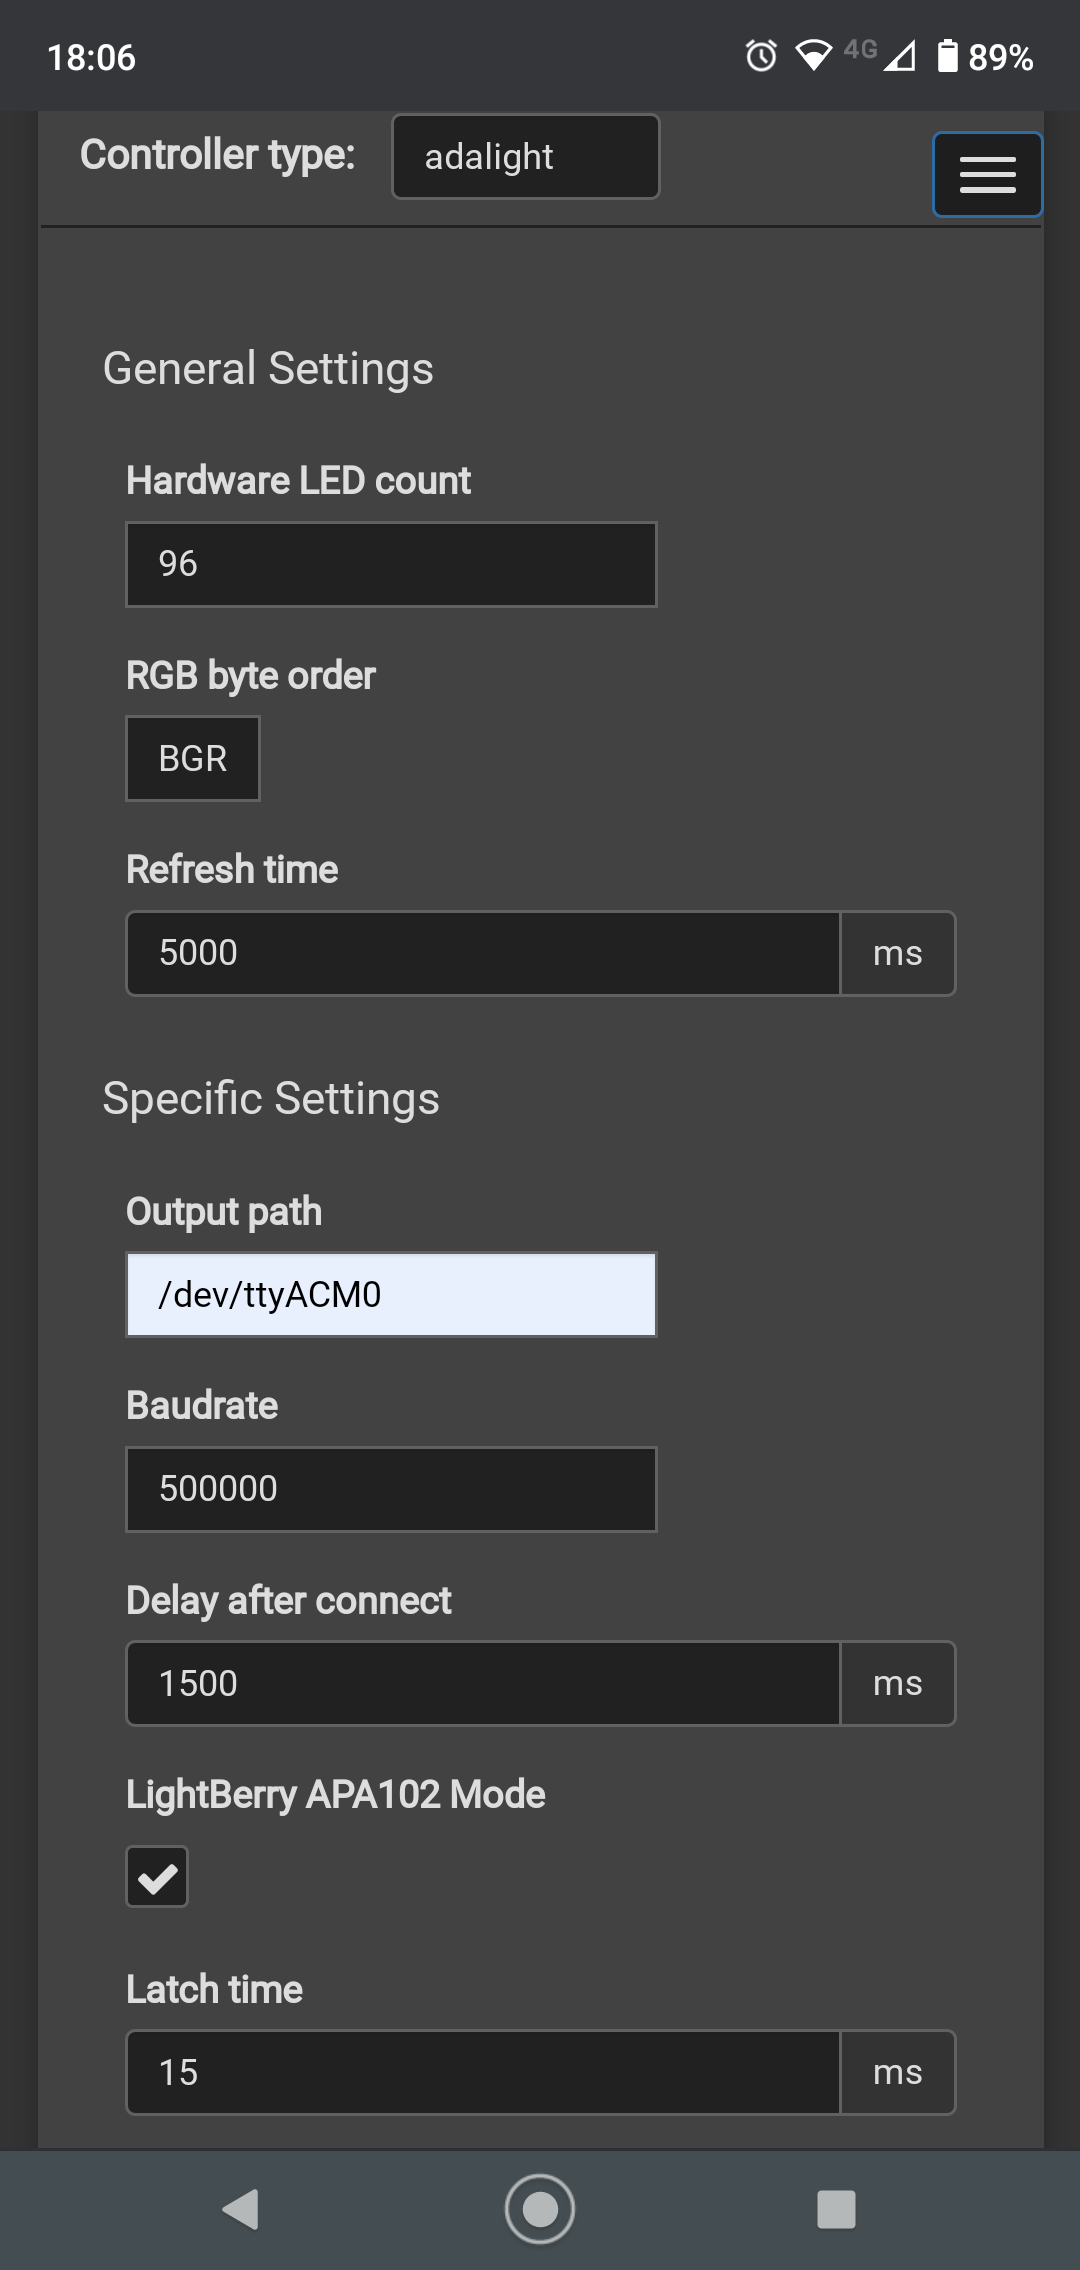
You’ll just need to set the number of LEDs and describe the layout in the next page.
Oh wow - I’ll give it a go this weekend then!
It may mean less janky CEC/HDMI handshaking…  - thank you!
after endless tinkering with arduino sketches… I never get my 300 leds to work properly. But I found a different solution. Aircookies amazing WLED supports hyperion out of the box. GitHub - Aircoookie/WLED: Control WS2812B and many more types of digital RGB LEDs with an ESP8266 or ESP32 over WiFi!. Just flashed this onto a nodemcu, connected it to my TV and it just works. Bonus, it’s connected via Wifi and you don’t need a wired connection to your grabber.
This might be by far the easiest solution imho.
Isn’t that too much delay for hyperion?
it’s working very well for me and I can’t determine any lag compared to the arduino i used bevor. It’s connecting via upd, so there might be an advantage.
Hey @hissingshark
Managed to mostly get it working! Thank you for your scripts! (I did install from binary - and it all went ok!)

Is what the config looks like.
However - couple of quick (hopefully easy questions!)
There’s 4 unused LEDs folded over bottom right hand side - but I can’t seem to turn one of them off - any ideas?
Playing videos seems to work just fine, apart from youtube which goes horribly wrong (almost all the screen full of static, apart from a tiny bit at the top that has 4 very small versions of the video playing next to each other) – this was working before installing hyperion etc.
Also how do you get the LEDs to turn off when the TV turns off? (previously the grabber turned them off when the TV was put to standby, but now they stay on)